


 En
En

Raspberry Pi OS comes with Python pre-installed, and you need to use its virtual environments to install packages. The latest issue of The MagPi, out today, features this handy tutorial, penned by our documentation lead Nate Contino, to get you started.
Raspberry Pi OS comes with Python 3 pre-installed. Interfering with the system Python installation can cause problems for your operating system. When you install third-party Python libraries, always use the correct package-management tools.
On Linux, you can install python dependencies in two ways:
- use apt to install pre-configured system packages
- use pip to install libraries using Python’s dependency manager in a virtual environment
It is possible to create virtual environments inside Thonny as well as from the command line
Install Python packages using apt
Packages installed via apt are packaged specifically for Raspberry Pi OS. These packages usually come pre-compiled, so they install faster. Because apt manages dependencies for all packages, installing with this method includes all of the sub-dependencies needed to run the package. And apt ensures that you don’t break other packages if you uninstall.
For instance, to install the Python 3 library that supports the Raspberry Pi Build HAT, run the following command:
$ sudo apt install python3-build-hatTo find Python packages distributed with , use . In most cases, Python packages use the prefix or : for instance, you can find the numpy package under the name .aptapt searchpython-python3-python3-numpy
Install Python libraries using pip
In older versions of Raspberry Pi OS, you could install libraries directly into the system version of Python using pip. Since Raspberry Pi OS Bookworm, users cannot install libraries directly into the system version of Python.
 Instead, install libraries into a virtual environment (venv). To install a library at the system level for all users, install it with .apt
Attempting to install a Python package system-wide outputs an error similar to the following:
$ pip install buildhat
error: externally-managed-environment

× This environment is externally managed
╰─> To install Python packages system-wide, try apt install
    python3-xyz, where xyz is the package you are trying to
    install.

    If you wish to install a non-Debian-packaged Python package,
    create a virtual environment using python3 -m venv path/to/venv.
    Then use path/to/venv/bin/python and path/to/venv/bin/pip. Make
    sure you have python3-full installed.

    For more information visit http://rptl.io/venv

note: If you believe this is a mistake, please contact your Python installation or OS distribution provider. You can override this, at the risk of breaking your Python installation or OS, by passing --break-system-packages.
hint: See PEP 668 for the detailed specification.
Python users have long dealt with conflicts between OS package managers like and Python-specific package management tools like . These conflicts include both Python-level API incompatibilities and conflicts over file ownership.aptpip
Starting in Raspberry Pi OS Bookworm, packages installed via must be installed into a Python virtual environment (venv). A virtual environment is a container where you can safely install third-party modules so they won’t interfere with your system Python.pip
Use pip with virtual environments
To use a virtual environment, create a container to store the environment. There are several ways you can do this depending on how you want to work with Python:
per-project environments
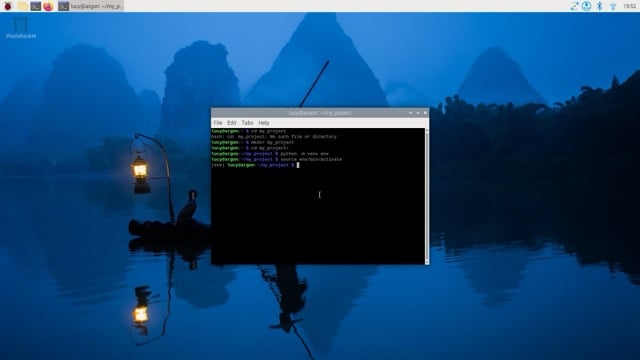
Many users create separate virtual environments for each Python project. Locate the virtual environment in the root folder of each project, typically with a shared name like env. Run the following command from the root folder of each project to create a virtual environment configuration folder:
$ python -m venv envBefore you work on a project, run the following command from the root of the project to start using the virtual environment:
$ source env/bin/activateYou should then see a prompt similar to the following:
$ (.env) $When you finish working on a project, run the following command from any directory to leave the virtual environment:
$ deactivateper-user environments
Instead of creating a virtual environment for each of your Python projects, you can create a single virtual environment for your user account. Activate that virtual environment before running any of your Python code. This approach can be more convenient for workflows that share many libraries across projects.
When creating a virtual environment for multiple projects across an entire user account, consider locating the virtual environment configuration files in your home directory. Store your configuration in a folder whose name begins with a period to hide the folder by default, preventing it from cluttering your home folder.
 Use the following command to create a virtual environment in a hidden folder in the current user’s home directory:
$ python -m venv ~/.envRun the following command from any directory to start using the virtual environment:
$ source ~/.env/bin/activateYou should then see a prompt similar to the following:
(.env) $To leave the virtual environment, run the following command from any directory:
$ deactivateCreate a virtual environment
Run the following command to create a virtual environment configuration folder, replacing <env-name> with the name you would like to use for the virtual environment (e.g. env):
$ python -m venv <env-name>Enter a virtual environment
Then, execute the bin/activate script in the virtual environment configuration folder to enter the virtual environment:
$ source <env-name>/bin/activateYou should then see a prompt similar to the following:
(<env-name>) $The (<env-name>) command prompt prefix indicates that the current terminal session is in a virtual environment named <env-name>.
To check that you’re in a virtual environment, use pip list to view the list of installed packages:
(<env-name>) $ pip list
Package    Version
---------- -------
pip        23.0.1
setuptools 66.1.1
The list should be much shorter than the list of packages installed in your system Python. You can now safely install packages with pip. Any packages you install with pip while in a virtual environment only install to that virtual environment. In a virtual environment, the python or python3 commands automatically use the virtual environment’s version of Python and installed packages instead of the system Python.
Top Tip:Pass the –system-site-packages flag before the folder name to preload all of the currently installed packages in your system Python installation into the virtual environment.
Exit a virtual environment
To leave a virtual environment, run the following command:
(<env-name>) $ deactivateUse the Thonny editor
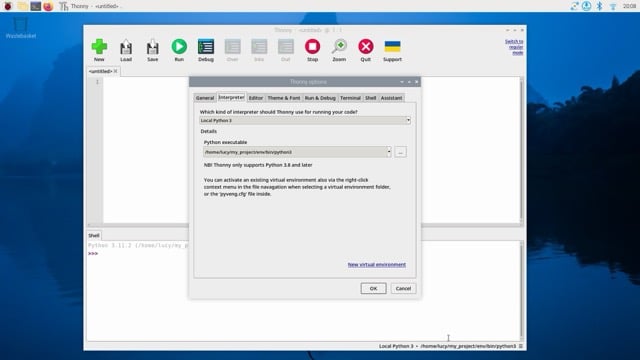
We recommend Thonny for editing Python code on the Raspberry Pi.
By default, Thonny uses the system Python. However, you can switch to using a Python virtual environment by clicking on the interpreter menu in the bottom right of the Thonny window. Select a configured environment or configure a new virtual environment with Configure interpreter.
原文链接: https://www.raspberrypi.com/news/using-python-with-virtual-environments-the-magpi-148/


