


 En
En

 Introduction.
This page will guide you through the installation of TensorFlow on a Raspberry Pi 4 with a 64-bit Bullseye operating system.
TensorFlow is a large software library specially developed for deep learning. It consumes a vast amount of resources. You can execute TensorFlow on a Raspberry Pi 4, but don't expect miracles. It can run your models, if not too complex, but it will not be able to train new models. Nor can it perform the so-called transfer learning. In addition to running your pre-built deep learning models, you may use the library to convert so-called frozen TensorFlow models to TensorFlow Lite flat buffer models.
If you only want to get some impression of deep learning, please consider installing TensorFlow Lite. It is much faster and uses far fewer recourses, as being designed for small computers like a Raspberry Pi. There are many ready build models you can use. See our installation guide for the 64-bit Raspberry here.
Roadmap.
TensorFlow continues to grow. Each new release requires more resources, supporting software and libraries. It increasingly puts a heavy burden on your Raspberry Pi. It explains why the latest versions don't work well on 'old' Raspberry Pis with an 'outdated' operating system.
On the other hand, it is not advisable to install a very old TensorFlow version on the latest Bullseye. You will be forced to downgrade some system libraries, which will prevent other software from working. The motto here: "Go with the Flow".
Below is an overview. A green checkmark indicates a wheel is available. An empty green box means there is no wheel, but installation is still possible. A grey box specifies hardware or software limitations that do not allow a 'normal' installation.
| System / TensorFLow vesion | 2.14 | 2.13 | 2.12 | 2.11 | 2.10 | 2.9 | 2.8 | 2.7 | 2.6 | 2.5 | 2.4 | 2.3 | 2.2 | 2.1 | 2.0 |
| Raspberry Pi 32-bit Buster | √ | √ | |||||||||||||
Raspberry Pi 64-bit Buster | √ | √ | √ | √ | √ | ||||||||||
| Raspberry Pi Ubuntu 18.04 | √ | √ | √ | ||||||||||||
| Raspberry Pi Ubuntu 20.04 | √ | √ | √ | √ | √ | ||||||||||
Raspberry Pi Bullseye | √ | √ | √ | √ | √ | √ | √ | √ | √ | √ | |||||
Raspberry Pi Bookworm | √ | √ | √ | ||||||||||||
| Jetson Nano JetPack 4.6 | √ | √ |
Tip.

Regularly, we get the question if we have an SD image of a Raspberry Pi 4 with pre-installed frameworks and deep-learning examples.
We are happy to comply with this request. Please, find a complete working Raspberry Pi 4 dedicated to deep learning on our page. Download the zip file from our GDrive site, unzip and flash the image on a 32 GB SD-card, and enjoy!
https://github.com/Qengineering/RPi-Bullseye-DNN-image
We discuss two installations, one for Python 3 and one C++ API library. Unfortunately, there is no official aarch64 pip3 wheel available for the 2.7, 2.6 or 2.5 versions. However, we created our wheels with Bazel and put them on GitHub for your convenience.
The last part of this guide discuss the installation of Keras.
Preparations.
Numpy.
Tensorflow has encountered issues with the latest versions of numpy. It became a real struggle to port TensorFlow to numpy 1.20. Now, with TensorFlow version 2.8.0, it finally succeeded. At last, there are no numpy version conflicts anymore when TensorFlow is installed.
However, TensorFlow 2.7.0 still reports a few issues. To be on the safe side, use numpy version 1.19.5 for TF 2.7.0 to make sure everything is working fine.
libclang 9.0.1.
TensorFlow 2.7.0 relies on libclang 9.0.1. There is no distribution available for Debian 10. That's why there is only a TensorFlow 2.7 installation for Debian 11, Bullseye. You could probably install libclang 9.0.1 on your Buster RPi from scratch so that you can then install TensorFlow. Be aware, the clang build takes huge resources, over 5 GB. It's better to switch to Bullseye and have TensorFlow up and running in half an hour.
Protobuffer 4.21.
The latest version of Protobuffer 4.21.0 has some significant improvements over the previous version 3.20.1. However, TensorFlow does not yet support these changes. For TensorFlow to work, you need to downgrade your Protobuf to version 3.20 if you have 4.21 installed.
More info on how to downgrade can be found on our GitHub page.
https://github.com/Qengineering/TensorFlow-Raspberry-Pi_64-bit#tensorflow-2100
tensorflow-io-gcs-filesystem
All dependencies can be installed with just one command, except for the tensorflow-io-gcs file system. Since there is no distribution for an aarch64 machine, we have to build the tensorflow-io-gcs file system from scratch. The entire procedure can be found below and should be done before TensorFlow itself is installed. If you let TensorFlow install the io-gcs, it will select the wrong version and will not work.
# get a fresh start
$ sudo apt-get update
$ sudo apt-get upgrade
# install pip3
$ sudo apt-get install git python3-pip
# install correct version protobuf
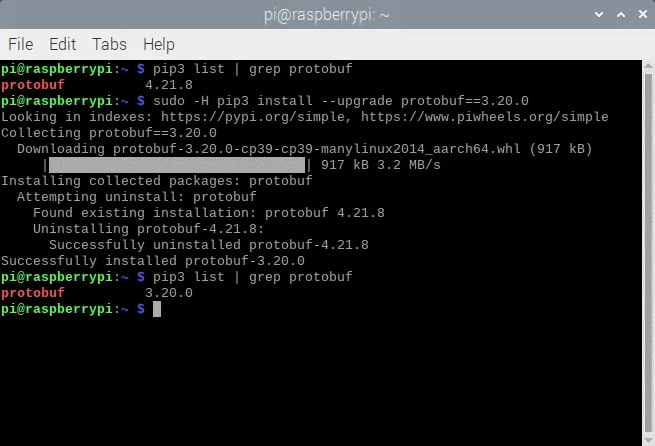
$ sudo -H pip3 install --upgrade protobuf==3.20.0
Method 1
# download tensorflow io
$ git clone -b v0.23.1 --depth=1 --recursive https://github.com/tensorflow/io.git
$ cd io
$ python3 setup.py -q bdist_wheel --project tensorflow_io_gcs_filesystem
$ cd dist
$ sudo -H pip3 install tensorflow_io_gcs_filesystem-0.23.1-cp39-cp39-linux_aarch64.whl
$ cd ~
Method 2
# or download wheel
$ git clone https://github.com/Qengineering/Tensorflow-io.git
$ cd Tensorflow-io
$ sudo -H pip3 install tensorflow_io_gcs_filesystem-0.23.1-cp39-cp39-linux_aarch64.whl
$ cd ~TensorFlow wheels for Python 3.9.
TensorFlow is installed by a Google software installer called Bazel. In the end, Bazel generates a wheel to install the TensorFlow Python version or a tarball when it comes to installing the C++ version. Both methods are well known to Raspberry Pi users. We have posted the Bazel outcomes on our GitHub page. Feel free to use these wheels. The whole TensorFlow installation procedure from start to end takes many hours (±64 for Python, ±1 for the C++ library). With all the tedious work already done, it takes only a few minutes to install TensorFlow on your Raspberry 64-bit Bullseye. For the diehards, the complete procedure is covered later in this manual.
The whole shortcut procedure is found below. The wheel was too large to store at GitHub, so Google drive is used instead.
# install TensorFlow 2.14.0
$ sudo -H pip3 install --upgrade tensorflow==2.14.0
TensorFlow 2.13.0
# install TensorFlow 2.13.0
$ sudo -H pip3 install --upgrade tensorflow==2.13.0
TensorFlow 2.12.0
# install TensorFlow 2.12.0
$ sudo -H pip3 install --upgrade tensorflow==2.12.0
TensorFlow 2.11.0
# install TensorFlow 2.11.0
$ sudo -H pip3 install --upgrade tensorflow==2.11.0
TensorFlow 2.10.0
# install gdown to download from Google drive
$ sudo -H pip3 install gdown
# download the wheel
$ gdown https://drive.google.com/uc?id=1G2P-FaHAXJ-UuQAQn_0SYjNwBu0aShpd
# install TensorFlow 2.10.0
$ sudo -H pip3 install tensorflow-2.10.0-cp39-cp39-linux_aarch64.whl
TensorFlow 2.9.1
# install gdown to download from Google drive
$ sudo -H pip3 install gdown
# download the wheel
$ gdown https://drive.google.com/uc?id=1xP6ErBK85SMFnQamUh4ro3jRmdCV_qDU
# install TensorFlow 2.9.1
$ sudo -H pip3 install tensorflow-2.9.1-cp39-cp39-linux_aarch64.whl
TensorFlow 2.8.1
# install gdown to download from Google drive
$ sudo -H pip3 install gdown
# download the wheel
$ gdown https://drive.google.com/uc?id=1YpxNubmEL_4EgTrVMu-kYyzAbtyLis29
# install TensorFlow 2.8.0
$ sudo -H pip3 install tensorflow-2.8.0-cp39-cp39-linux_aarch64.whl
TensorFlow 2.7.0
# utmost important: useonly numpy version 1.19.5
# check the version first
$ pip3 list | grep numpy
# if not version 1.19.5, update!
$ sudo -H pip3 install numpy==1.19.5
# (re)install termcolor at the correct location
$ python3 -m pip install termcolor
# install gdown to download from Google drive
$ sudo -H pip3 install gdown
# download the wheel
$ gdown https://drive.google.com/uc?id=1FdVZ1kX5QZgWk2SSgq31C2-CF95QhT58
# install TensorFlow 2.7.0
$ sudo -H pip3 install tensorflow-2.7.0-cp39-cp39-linux_aarch64.whl
When the installation is successful, you should get the following screendump.
 TensorFlow C++ API.
If you are planning to program in C++, you will need the C++ API build of TensorFlow instead of the Python version. Installing the C ++ library using the pre-build tarball from our GitHub page saves you a lot of time. Please follow the procedure below.
# get a fresh start
$ sudo apt-get update
$ sudo apt-get upgrade
# remove old versions (if found)
$ sudo rm -r /usr/local/lib/libtensorflow*
$ sudo rm -r /usr/local/include/tensorflow
# the dependencies
$ sudo apt-get install wget curl libhdf5-dev libc-ares-dev libeigen3-dev
$ sudo apt-get install libatomic1 libatlas-base-dev zip unzip
# install gdown to download from Google drive (if not already done)
$ sudo -H pip3 install gdown
# download the tarball
$ gdown https://drive.google.com/uc?id=1GOC5CiT5Ws2NpiBem4K3g3FRqmGDRcL7
# unpack the ball
$ sudo tar -C /usr/local -xzf libtensorflow_cp39_64OS_2_10_0.tar.gz
TensorFlow 2.9.1
# get a fresh start
$ sudo apt-get update
$ sudo apt-get upgrade
# remove old versions (if found)
$ sudo rm -r /usr/local/lib/libtensorflow*
$ sudo rm -r /usr/local/include/tensorflow
# the dependencies
$ sudo apt-get install wget curl libhdf5-dev libc-ares-dev libeigen3-dev
$ sudo apt-get install libatomic1 libatlas-base-dev zip unzip
# install gdown to download from Google drive (if not already done)
$ sudo -H pip3 install gdown
# download the tarball
$ gdown https://drive.google.com/uc?id=1Z83_RQTvCb2jL2BO1Zdez3x4Qx-XheRk
# unpack the ball
$ sudo tar -C /usr/local -xzf libtensorflow_cp39_64OS_2_9_1.tar.gz
TensorFlow 2.8.0
# get a fresh start
$ sudo apt-get update
$ sudo apt-get upgrade
# remove old versions (if found)
$ sudo rm -r /usr/local/lib/libtensorflow*
$ sudo rm -r /usr/local/include/tensorflow
# the dependencies
$ sudo apt-get install wget curl libhdf5-dev libc-ares-dev libeigen3-dev
$ sudo apt-get install libatomic1 libatlas-base-dev zip unzip
# install gdown to download from Google drive (if not already done)
$ sudo -H pip3 install gdown
# download the tarball
$ gdown https://drive.google.com/uc?id=1dmJKIk8lUi_XCzlVnRgL-UvfVFriRmCG
# unpack the ball
$ sudo tar -C /usr/local -xzf libtensorflow_cp39_64OS_2_8_0.tar.gz
TensorFlow 2.7.0
# get a fresh start
$ sudo apt-get update
$ sudo apt-get upgrade
# remove old versions (if found)
$ sudo rm -r /usr/local/lib/libtensorflow*
$ sudo rm -r /usr/local/include/tensorflow
# the dependencies
$ sudo apt-get install wget curl libhdf5-dev libc-ares-dev libeigen3-dev
$ sudo apt-get install libatomic1 libatlas-base-dev zip unzip
# install gdown to download from Google drive (if not already done)
$ sudo -H pip3 install gdown
# download the tarball
$ gdown https://drive.google.com/uc?id=1kScCKyj0pr265XbCgYmXqXs77xJFe6p1
# unpack the ball
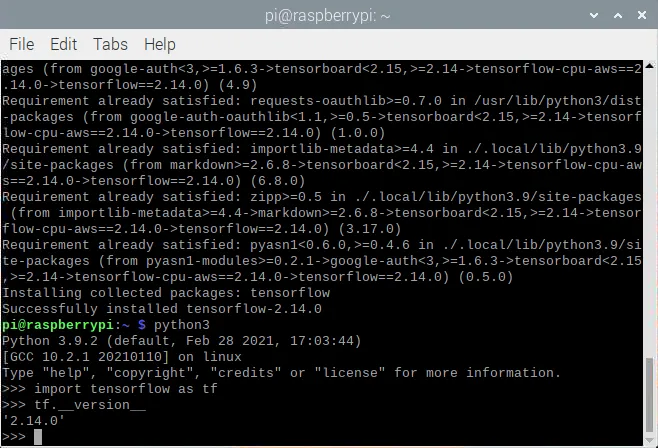
$ sudo tar -C /usr/local -xzf libtensorflow_cp39_64OS_2_7_0.tar.gzYou should end up having your TensorFlow library installed at the /usr/local/lib location and the header files in the folder usr/local/include/tensorflow/c.
Installation from scratch.
For TensorFlow 2.14 and higher
https://qengineering.eu/install-tensorflow-on-raspberry-pi-5.html
Memory swap size.
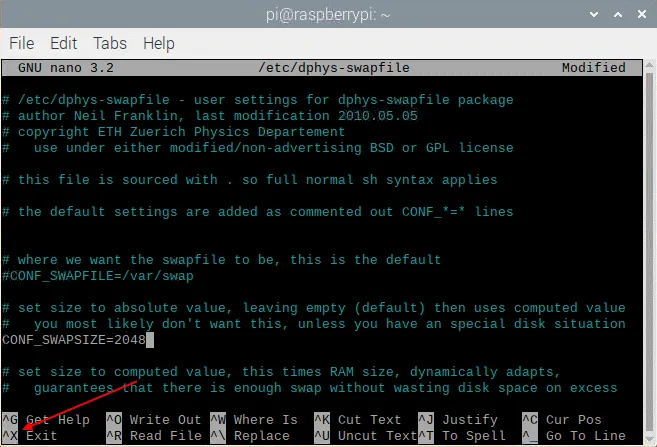
Building the full TensorFlow package requires more than 6 Gbytes of RAM. If you have a Raspberry Pi 4 with 8 Gbyte RAM, you are in the clear. Otherwise, make sure to increase the swap size to meet this demand. With 4 Gbyte RAM onboard, zram can deliver the extra 2 Gbyte. With 2 Gbyte of RAM, you can no longer rely on zram to compress above a factor of 2. In this case, they have to reinstall dphys-swapfile to get the extra space from your SD card. Please follow the next commands if you have to install dphys-swapfile. It takes quite a while to complete the reboot when setting up swap space on a Bullseye OS.
# install dphys-swapfile
$ sudo apt-get install dphys-swapfile
# give the required memory size
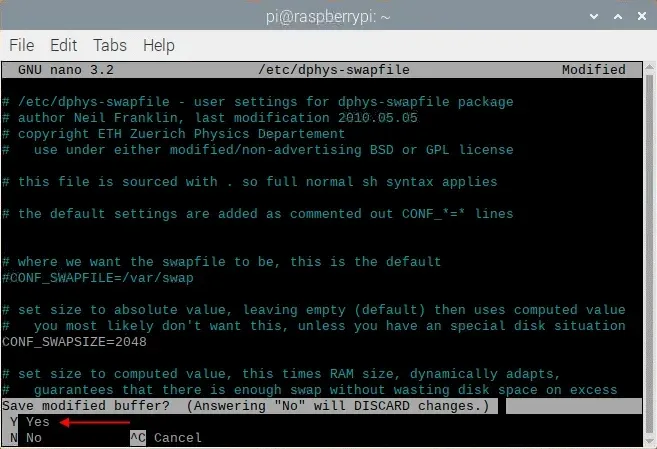
$ sudo nano /etc/dphys-swapfile
# reboot afterwards
$ sudo reboot
 If all went well, you should have something like this.
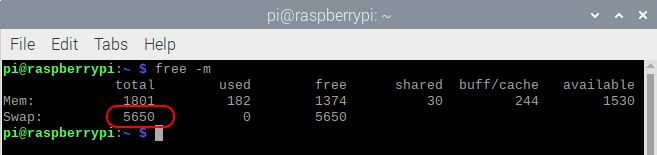 For the record, the figure shown is total amount of swap space allocated by dphys-swapfile and zram. Please, don't forget to remove dphys-swapfile when your done.
Note: if you reboot the Raspberry Pi with both zram and dphys-swapfile enabled, zram will disable dphys-swapfile during boot. You must manually reactivate this service.
# reactivate dphys-swapfile after a reboot
# (when zram and dphys-swapfile are both enabled)
$ sudo /etc/init.d/dphys-swapfile stop
$ sudo /etc/init.d/dphys-swapfile start
Bazel.
Bazel is a free software tool from Google used for automatically building and testing software packages. You could compare it to CMake, used by OpenCV, but the latter only builds software and has no test facility. Bazel is written in Java, a platform-independent language, largely based on C ++ in terms of syntax. To compile Bazel, we must first install Java and some other dependencies with the following commands.
# get a fresh start
$ sudo apt-get update
$ sudo apt-get upgrade
# install pip and pip3
$ sudo apt-get install python3-pip
# install some tools
$ sudo apt-get install zip unzip curl
# install Java
$ sudo apt-get install openjdk-11-jdk
Next, we can download and unzip the Bazel software. We need Bazel release 5.1.1 for TensorFlow 2.10, so be sure you install the right version.
$ wget https://github.com/bazelbuild/bazel/releases/download/5.1.1/bazel-5.1.1-dist.zip
$ unzip -d bazel bazel-5.1.1-dist.zip
$ cd bazel
During installation, Bazel uses a predefined ratio of the available working memory. This ratio is too small due to the limited size of the RAM of the Raspberry Pi. To prevent crashes, we must define the size of this memory to a maximum of 40% of the RAM onboard. For instance, 800 Mbyte for 2 GByte RAM Raspberry Pi. It is done by adding some extra information to the script file compile.sh. You can add the text -J-Xmx800M to the line that begins with run..(around line 144). See the screen below. Use the well-known
$nano scripts/bootstrap/compile.sh -c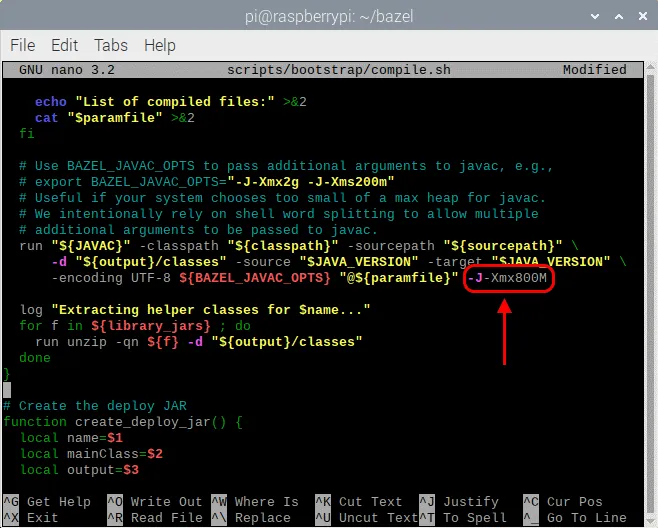
Once the Java environment for Bazel has been maximized, you can start building the Bazel software with the next commands. When finished, copy the binary file to the /usr/local/bin location so that bash can find the executable anywhere. The final action is to delete the zip file. The total build takes about 33 minutes.
# start the build
$ env EXTRA_BAZEL_ARGS="--host_javabase=@local_jdk//:jdk" bash ./compile.sh
# copy the binary
$ sudo cp output/bazel /usr/local/bin/bazel
# clean up
$ cd ~
$ rm bazel-5.1.1-dist.zip
# if you have a copied bazel to /usr/local/bin you may also
# delete the whole bazel directory, freeing another 500 MByte
$ sudo rm -rf bazel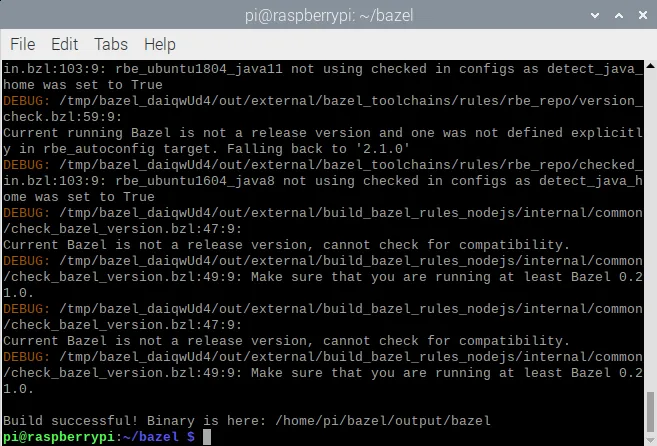 Install TensorFlow for Python 3.
With Bazel up and running we can start building TensorFlow 2.10.0 on our 64-bit Raspberry Pi for Python 3. It is almost becoming standard practice. First, install some dependencies, then download the zip from GitHub and finally unpack the software. You must also install the tensorflow_io_gcs file system. It is done by using the precompiled wheel from our GitHub repo.
# get a fresh start
$ sudo apt-get update
$ sudo apt-get upgrade
# the dependencies
$ sudo apt-get install zip unzip
$ sudo -H pip3 install keras_applications --no-deps
$ sudo -H pip3 install keras_preprocessing --no-deps
# install correct version protobuf
$ sudo -H pip3 install --upgrade protobuf==3.20.0
# download tensorflow io
$ git clone https://github.com/Qengineering/Tensorflow-io.git
$ cd Tensorflow-io
$ sudo -H pip3 install tensorflow_io_gcs_filesystem-0.23.1-cp39-cp39-linux_aarch64.whl
$ cd ~
# download TensorFlow 2.10.0
$ wget -O tensorflow.zip https://github.com/tensorflow/tensorflow/archive/v2.10.0.zip
$ unzip tensorflow.zip
$ cd tensorflow-2.10.0
$ ./configure
TensorFlow 2.9.1
# get a fresh start
$ sudo apt-get update
$ sudo apt-get upgrade
# the dependencies
$ sudo apt-get install zip unzip
$ sudo -H pip3 install keras_applications --no-deps
$ sudo -H pip3 install keras_preprocessing --no-deps
# install correct version protobuf
$ sudo -H pip3 install --upgrade protobuf==3.20.0
# download tensorflow io
$ git clone https://github.com/Qengineering/Tensorflow-io.git
$ cd Tensorflow-io
$ sudo -H pip3 install tensorflow_io_gcs_filesystem-0.23.1-cp39-cp39-linux_aarch64.whl
$ cd ~
# download TensorFlow 2.9.1
$ wget -O tensorflow.zip https://github.com/tensorflow/tensorflow/archive/v2.9.1.zip
$ unzip tensorflow.zip
$ cd tensorflow-2.9.1
$ ./configure
TensorFlow 2.8.0
# get a fresh start
$ sudo apt-get update
$ sudo apt-get upgrade
# the dependencies
$ sudo apt-get install zip unzip
$ sudo -H pip3 install keras_applications --no-deps
$ sudo -H pip3 install keras_preprocessing --no-deps
# install correct version protobuf
$ sudo -H pip3 install --upgrade protobuf==3.20.0
$ cd ~
# download TensorFlow 2.8.0
$ wget -O tensorflow.zip https://github.com/tensorflow/tensorflow/archive/v2.8.0.zip
$ unzip tensorflow.zip
$ cd tensorflow-2.8.0
$ ./configure
TensorFlow 2.7.0
# get a fresh start
$ sudo apt-get update
$ sudo apt-get upgrade
# the dependencies
$ sudo apt-get install zip unzip
$ sudo -H pip3 install keras_applications --no-deps
$ sudo -H pip3 install keras_preprocessing --no-deps
# download TensorFlow 2.7.0
$ wget -O tensorflow.zip https://github.com/tensorflow/tensorflow/archive/v2.7.0.zip
$ unzip tensorflow.zip
$ cd tensorflow-2.7.0
$ ./configure
The final step before building the Python 3 installation wheel is to configure your build with the some environment variables. This is done by the ./configure script file. Define Python 3 as the default Python version and 'no' to all other questions.
pi@raspberrypi:~/tensorflow-2.10.0 $ ./configure
You have bazel 5.1.1- (@non-git) installed.
Please specify the location of python. [Default is /usr/bin/python3]:

Found possible Python library paths:
 /usr/lib/python3/dist-packages
 /usr/local/lib/python3.9/dist-packages
Please input the desired Python library path to use.  Default is [/usr/lib/python3/dist-packages]

Do you wish to build TensorFlow with ROCm support? [y/N]: n
No ROCm support will be enabled for TensorFlow.

Do you wish to build TensorFlow with CUDA support? [y/N]: n
No CUDA support will be enabled for TensorFlow.

Do you wish to download a fresh release of clang? (Experimental) [y/N]: n
Clang will not be downloaded.

Please specify optimization flags to use during compilation when bazel option "--config=opt" is specified [Default is -Wno-sign-compare]:

Would you like to interactively configure ./WORKSPACE for Android builds? [y/N]: n
Not configuring the WORKSPACE for Android builds.

Preconfigured Bazel build configs. You can use any of the below by adding "--config=<>" to your build command. See .bazelrc for more details.
--config=mkl          # Build with MKL support.
--config=mkl_aarch64 # Build with oneDNN and Compute Library for the Arm Architecture (ACL).
--config=monolithic   # Config for mostly static monolithic build.
--config=numa         # Build with NUMA support.
--config=dynamic_kernels # (Experimental) Build kernels into separate shared objects.
--config=v2           # Build TensorFlow 2.x instead of 1.x.
Preconfigured Bazel build configs to DISABLE default on features:
--config=noaws        # Disable AWS S3 filesystem support.
--config=nogcp        # Disable GCP support.
--config=nohdfs       # Disable HDFS support.
--config=nonccl       # Disable NVIDIA NCCL support.
Configuration finished
With the script file now all set and done, the massive build can start with the command below. The -Xmx1624m sets the memory size of the Java environment where Bazel runs. Give it as much space as possible. We advise 80% of your Raspberry Pi memory size. In our case we have 2 Gbyte onboard, so 1624 Mbyte leaves just enough space for other threads apart from Bazel.
Another point is the number of cores that Basel uses. Best to use one core. Better a little slower than a crash (always at the end) and start all over again.
Close all other applications during the build. The fewer other processes running, the faster your compilation will be.
$ sudo bazel clean
$ sudo bazel --host_jvm_args=-Xmx1624m build \
--config=opt \
--config=noaws \
--config=nogcp \
--config=nohdfs \
--config=nonccl \
--config=monolithic \
--config=v2 \
--local_cpu_resources=1 \
--define=tflite_pip_with_flex=true \
--copt=-ftree-vectorize \
--copt=-funsafe-math-optimizations \
--copt=-ftree-loop-vectorize \
--copt=-fomit-frame-pointer \
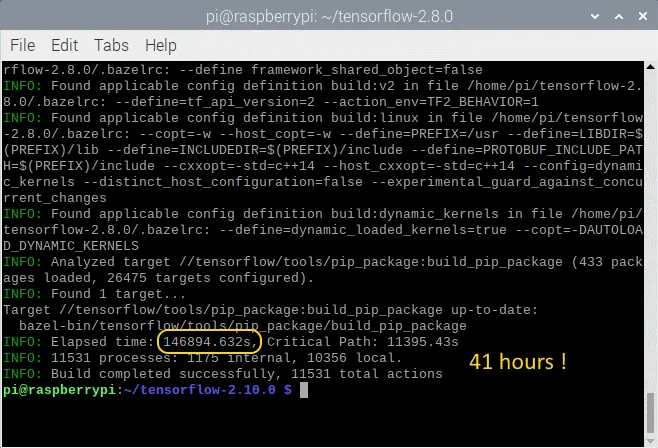
//tensorflow/tools/pip_package:build_pip_packageAfter 41 hours (or more!) compilation, hopefully, you will see with the following screen.
 Now we have to generate the wheel and install it. This is done by the commands below. The installation takes about only a few minutes.
TensorFlow 2.10.0
# synthesize the wheel
$ sudo bazel-bin/tensorflow/tools/pip_package/build_pip_package /tmp/tensorflow_pkg
$ cd ~
# go to the folder where the wheel is located and install tensorflow
$ cd /tmp/tensorflow_pkg
$ sudo -H pip3 install tensorflow-2.10.0-cp39-cp39-linux_aarch64.whl
TensorFlow 2.9.1
# synthesize the wheel
$ sudo bazel-bin/tensorflow/tools/pip_package/build_pip_package /tmp/tensorflow_pkg
$ cd ~
# go to the folder where the wheel is located and install tensorflow
$ cd /tmp/tensorflow_pkg
$ sudo -H pip3 install tensorflow-2.9.1-cp39-cp39-linux_aarch64.whl
TensorFlow 2.8.0
# synthesize the wheel
$ sudo bazel-bin/tensorflow/tools/pip_package/build_pip_package /tmp/tensorflow_pkg
$ cd ~
# go to the folder where the wheel is located and install tensorflow
$ cd /tmp/tensorflow_pkg
$ sudo -H pip3 install tensorflow-2.8.0-cp39-cp39-linux_aarch64.whl
TensorFlow 2.7.0
# synthesize the wheel
$ sudo bazel-bin/tensorflow/tools/pip_package/build_pip_package /tmp/tensorflow_pkg
$ cd ~
# go to the folder where the wheel is located and install tensorflow
$ cd /tmp/tensorflow_pkg
$ sudo -H pip3 install tensorflow-2.7.0-cp39-cp39-linux_aarch64.whl
Install the TensorFlow C++ API.
As mentioned earlier, you can install the TensorFlow C++ API very quickly by using the tarball on our GitHub page; no need to go through lengthy installation procedures. For those who want to build the API themselves, the installation guide now follows.
First, install Bazel if not already done. The procedure is also descript above. Once Bazel is working, you can install the dependencies and download TensorFlow, if not already done for the Python 3 installation earlier.
TensorFlow 2.10.0
# the dependencies
$ sudo apt-get install build-essential make cmake wget zip unzip
$ sudo apt-get install libhdf5-dev libc-ares-dev libeigen3-dev
$ sudo apt-get install libatlas-base-dev
# download TensorFlow 2.10.0
$ wget -O tensorflow.zip https://github.com/tensorflow/tensorflow/archive/v2.10.0.zip
# unpack the folder
$ unzip tensorflow.zip
$ cd tensorflow-2.10.0
$ ./configure
TensorFlow 2.9.1
# the dependencies
$ sudo apt-get install build-essential make cmake wget zip unzip
$ sudo apt-get install libhdf5-dev libc-ares-dev libeigen3-dev
$ sudo apt-get install libatlas-base-dev
# download TensorFlow 2.9.1
$ wget -O tensorflow.zip https://github.com/tensorflow/tensorflow/archive/v2.9.1.zip
# unpack the folder
$ unzip tensorflow.zip
$ cd tensorflow-2.9.1
$ ./configure
TensorFlow 2.8.0
# the dependencies
$ sudo apt-get install build-essential make cmake wget zip unzip
$ sudo apt-get install libhdf5-dev libc-ares-dev libeigen3-dev
$ sudo apt-get install libatlas-base-dev
# download TensorFlow 2.8.0
$ wget -O tensorflow.zip https://github.com/tensorflow/tensorflow/archive/v2.8.0.zip
# unpack the folder
$ unzip tensorflow.zip
$ cd tensorflow-2.8.0
$ ./configure
TensorFlow 2.7.0
# the dependencies
$ sudo apt-get install build-essential make cmake wget zip unzip
$ sudo apt-get install libhdf5-dev libc-ares-dev libeigen3-dev
$ sudo apt-get install libatlas-base-dev
# download TensorFlow 2.7.0
$ wget -O tensorflow.zip https://github.com/tensorflow/tensorflow/archive/v2.7.0.zip
# unpack the folder
$ unzip tensorflow.zip
$ cd tensorflow-2.7.0
$ ./configure
Again, we need to configure Bazel before the actual build can start. Despite we are going to build a C++ API, the Bazel script file needs to be set to Python 3 as default Python version and 'no' to all other questions. Once all the questions of the script file are answered, you end up with the same output screen as shown above.
The last step is the command line with its options. Again, almost identical to the one earlier used. Most important here is the --config=monolithic flag. Without this direction, TensorFlow will not work with OpenCV or visa versa. Just like the pip compilation, the memory for Java environment (-Xmx1624m) has to be maximized to 80% of the memory the Raspberry Pi has onboard. The last line indicates a tarball library build instead of a pip wheel.
$ sudo bazel --host_jvm_args=-Xmx1624m build \
--config=opt \
--config=noaws \
--config=nogcp \
--config=nohdfs \
--config=nonccl \
--config=monolithic \
--config=v2 \
--local_cpu_resources=1 \
--copt=-ftree-vectorize \
--copt=-funsafe-math-optimizations \
--copt=-ftree-loop-vectorize \
--copt=-fomit-frame-pointer \
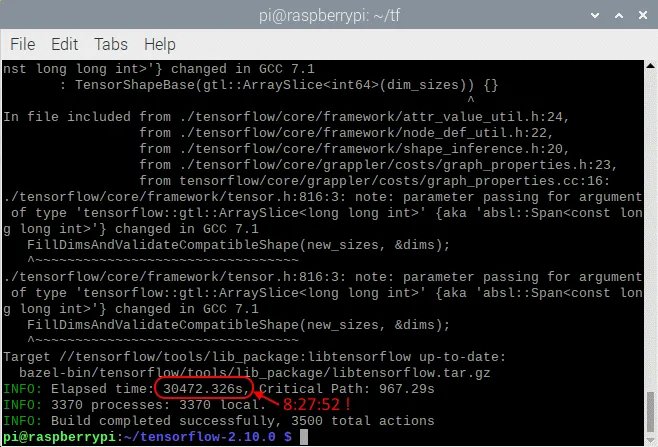
//tensorflow/tools/lib_package:libtensorflowAfter a long 12 hours wait, hopefully, you will see with the following screen.
The last step is installing the tarball. This is done by the command below.
# clean up the whole bazel cache
$ sudo rm -rf ~/.cache/bazel
Once installed you must have the same folders (/usr/local/lib and usr/local/include/tensorflow/c) as shown at the beginning of this page.
Cleaning.
After a successful installation, there are many files no longer needed. The intermediate object files generated by bazel occupy some 6 GByte of your disk. Removing doesn't harm anything.
# clean up the whole bazel cache
$ sudo rm -rf ~/.cache/bazel
If you had to reinstall dphys-swapfile, it's time to uninstall it again. This way you will extend the life of your SD card.
# remove the dphys-swapfile (if installed)
$ sudo /etc/init.d/dphys-swapfile stop
$ sudo apt-get remove --purge dphys-swapfile
Install Keras on Raspberry Pi 64 OS.
Once TensorFlow has been install, you can load Keras if you like. Keras is a high-level shell running on top of TensorFlow. It claims to be more user-friendly than TensorFlow, giving a more intuitive set of abstractions that make it easy to develop deep learning models. The installation is just one command.
$ pip3 install kerasOriginal link: https://qengineering.eu/install-tensorflow-on-raspberry-64-os.html


