4 软件操作指引
4.1 按键
ED-GWL2010包含1个用户自定义按键,连接到CPU的GPIO23管脚,默认状态下为高电平,当按键按下时,该管脚为低电平。
可使用raspi-gpio命令进行测试。
- 按键未按下时查询GPIO23管脚
raspi-gpio get 23
GPIO 23: level=1 fsel=0 func=INPUT
level为1表示GPIO23管脚为高电平。
- 按键按下时,查询GPIO23管脚
raspi-gpio get 23
GPIO 23: level=0 fsel=0 func=INPUT
level为0表示GPIO23管脚为低电平。
4.2 LED指示
ED-GWL2010包含一个RGB三色LED指示灯,相连的GPIO管脚对应如下:
| RGB LED管脚 | 对应GPIO |
|---|---|
| 蓝色 | GPIO16 |
| 绿色 | GPIO20 |
| 红色 | GPIO21 |
GPIO输出为低时,对应LED有效。
我们使用raspi-gpio命令进行操作,配置参数为op表示设置为输出,dl设置管脚为低电平,dh设置管脚为高电平。
LED显示为蓝色
sudo raspi-gpio set 16 op dl
sudo raspi-gpio set 20 op dh
sudo raspi-gpio set 21 op dh
LED显示为绿色
sudo raspi-gpio set 16 op dh
sudo raspi-gpio set 20 op dl
sudo raspi-gpio set 21 op dh
LED显示为红色
sudo raspi-gpio set 16 op dh
sudo raspi-gpio set 20 op dh
sudo raspi-gpio set 21 op dl
LED显示为黄色
sudo raspi-gpio set 16 op dh
sudo raspi-gpio set 20 op dl
sudo raspi-gpio set 21 op dl
4.3 以太网配置
ED-GWL2010包含一路自适应10/100/1000M以太网接口。
Raspberry Pi官方系统默认使用的dhcpcd作为网络管理工具。
设置静态IP通过修改/etc/dhcpcd.conf来设置,示例设置eth0,用户可以根据自己的不同需要设置wlan0等网络接口。
interface eth0
static ip_address=192.168.0.10/24
static routers=192.168.0.1
static domain_name_servers=192.168.0.1 8.8.8.8 fd51:42f8:caae:d92e::1
4.4 WIFI
ED-GWL2010支持 2.4GHz&5GHz IEEE 802.11 b/g/n 双频Wi-Fi。
Raspberry Pi官方系统默认使用的dhcpcd作为网络管理工具。
- 执行
sudo raspi-config。 - 选择1 System Options。
- 选择S1 Wireless LAN。
- 在Select the country in which the Pi is to be used 窗口中选择您的国家,然后选择OK,此提示仅在第一次设置Wi-Fi时出现。
- Please enter SSID,输入Wi-Fi SSID名称。
- Please enter passphrase. Leave it empty if none,输入密码,然后重启设备即可。
4.5 蓝牙
ED-GWL2010支持蓝牙5.0, 同时支持蓝牙低功耗(BLE), 蓝牙功能默认是开启的。
可使用bluetoothctl扫描,配对,连接蓝牙设备,请参考ArchLinux-Wiki-Bluetooth指引配置和使用蓝牙。
4.5.1 基本配置命令
| 命令 | 功能说明 |
|---|---|
| bluetoothctl scan on | 开启蓝牙扫描 |
| bluetoothctl scan off | 关闭蓝牙扫描 |
| bluetoothctl discoverable on | 开启蓝牙发现(可以让对方发现) |
| bluetoothctl discoverable off | 关闭蓝牙发现 |
| bluetoothctl trust device MAC | 信任设备 |
| bluetoothctl connect device MAC | 连接设备 |
| bluetoothctl disconnect device MAC | 与设备断开连接 |
4.5.2 配置示例
通过配置示例来介绍配置蓝牙的具体操作。
前提条件:
已开启蓝牙扫描。
已开启蓝牙发现
操作步骤:
- 进入bluetooth视图:
sudo bluetoothctl
- 使能bluetooth:
power on
- 扫描蓝牙设备:
scan on
回显信息:
Discovery started
[CHG] Controller B8:27:EB:85:04:8B Discovering: yes
[NEW] Device 4A:39:CF:30:B3:11 4A-39-CF-30-B3-11
- 查找开启的蓝牙设备名称:
devices
回显信息:
Device 6A:7F:60:69:8B:79 6A-7F-60-69-8B-79
Device 67:64:5A:A3:2C:A2 67-64-5A-A3-2C-A2
Device 56:6A:59:B0:1C:D1 Lefun
Device 34:12:F9:91:FF:68 test
- 配对test设备:
pair 34:12:F9:91:FF:68
34:12:F9:91:FF:68为目标设备的device_MAC
回显信息:
Attempting to pair with 34:12:F9:91:FF:68
[CHG] Device 34:12:F9:91:FF:68 ServicesResolved: yes
[CHG] Device 34:12:F9:91:FF:68 Paired: yes
Pairing successful
- 添加为信任设备
trust 34:12:F9:91:FF:68
34:12:F9:91:FF:68为目标设备的device_MAC
回显信息:
[CHG] Device 34:12:F9:91:FF:68 Trusted: yes
Changing 34:12:F9:91:FF:68 trust succeeded
4.6 LoRaWAN
ED-GWL2010支持LoRaWAN和开源服务平台ChirpStack,下文介绍具体的安装和配置。
提示
仅以US915 LoRa网关模块为例进行介绍。
4.6.1 Chirpstack客户端
以US915 LoRa网关模块为例。
设备在出厂时已安装firmware包、LoRa模块包以及chirpstack软件包,可通过dpkg -l | grep ed-命令检查对应的LoRa模块包。
如用户需要重新安装操作系统,请参考安装操作系统章节。
4.6.2 修改配置文件
4.6.2.1 修改json配置文件
- 执行如下命令,启动
ed-lora.service。
sudo systemctl enable --now ed-lora.service
- 执行如下命令,获取json配置文件的路径。
systemctl status ed-lora.service
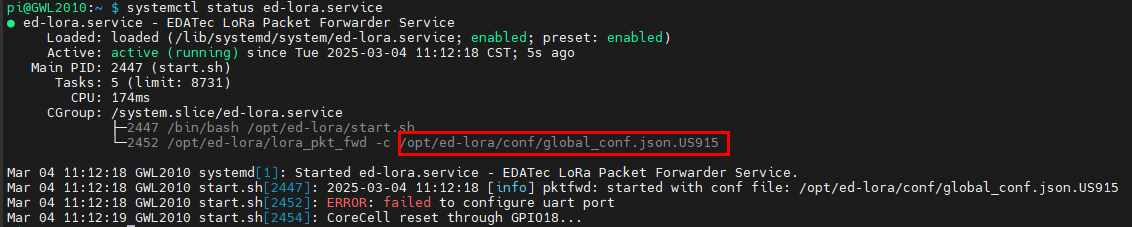
- 执行如下命令,打开json文件。
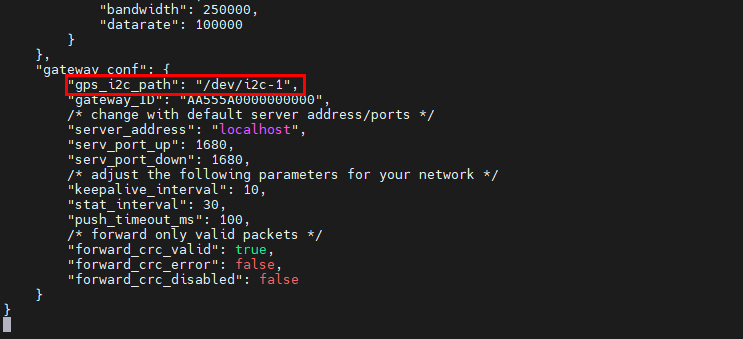
sudo nano /opt/ed-lora/conf/global_conf.json.US915
- 在文件底部删除删除"gps_i2c_path": "/dev/i2c-1"。
4.6.2.2 修改chirpstack配置文件
- 执行如下命令,打开配置文件。
sudo nano /etc/chirpstack-gateway-bridge/chirpstack-gateway-bridge.toml
修改如下部分的内容:
- 修改
udp_bind = "0.0.0.0:1700"为udp_bind = "0.0.0.0:1680" - 在gateway前添加网关型号:
- 修改
event_topic_template="gateway/{{ .GatewayID }}/event/{{ .EventType }}"为event_topic_template="us915_0/gateway/{{ .GatewayID }}/event/{{ .EventType }}"。 - 修改
command_topic_template="gateway/{{ .GatewayID }}/command/#"为command_topic_template="us915_0/gateway/{{ .GatewayID }}/command/#"。
- 修改
提示
如果您使用EU868或CN470模块,请将前缀
us915_0修改为eu868_0或cn470_10。- 修改
执行如下命令,重启对应的服务。
sudo systemctl daemon-reload
sudo systemctl restart chirpstack-gateway-bridge.service ed-lora.service
4.6.3 Chirpstack服务端
Chirpstack服务端可以部署在当前设备上,也可以部署在同一局域网内的设备上。本文档以在当前设备上部署为例。(如部署在局域网内的其它设备上,请修改3.10.2.2 修改chirpstack配置文件中udp_bind的0.0.0.0为该设备的IP)
- 部署Chirpstack服务端前,请执行如下命令安装docker-compose。
sudo apt install docker-compose -y
- 采用docker容器的方式部署ChirpStack服务端。
git clone https://github.com/chirpstack/chirpstack-docker.git

- 对
chirpstack-docker的docker-compose.yml进行配置。
cd chirpstack-docker
nano docker-compose.yml
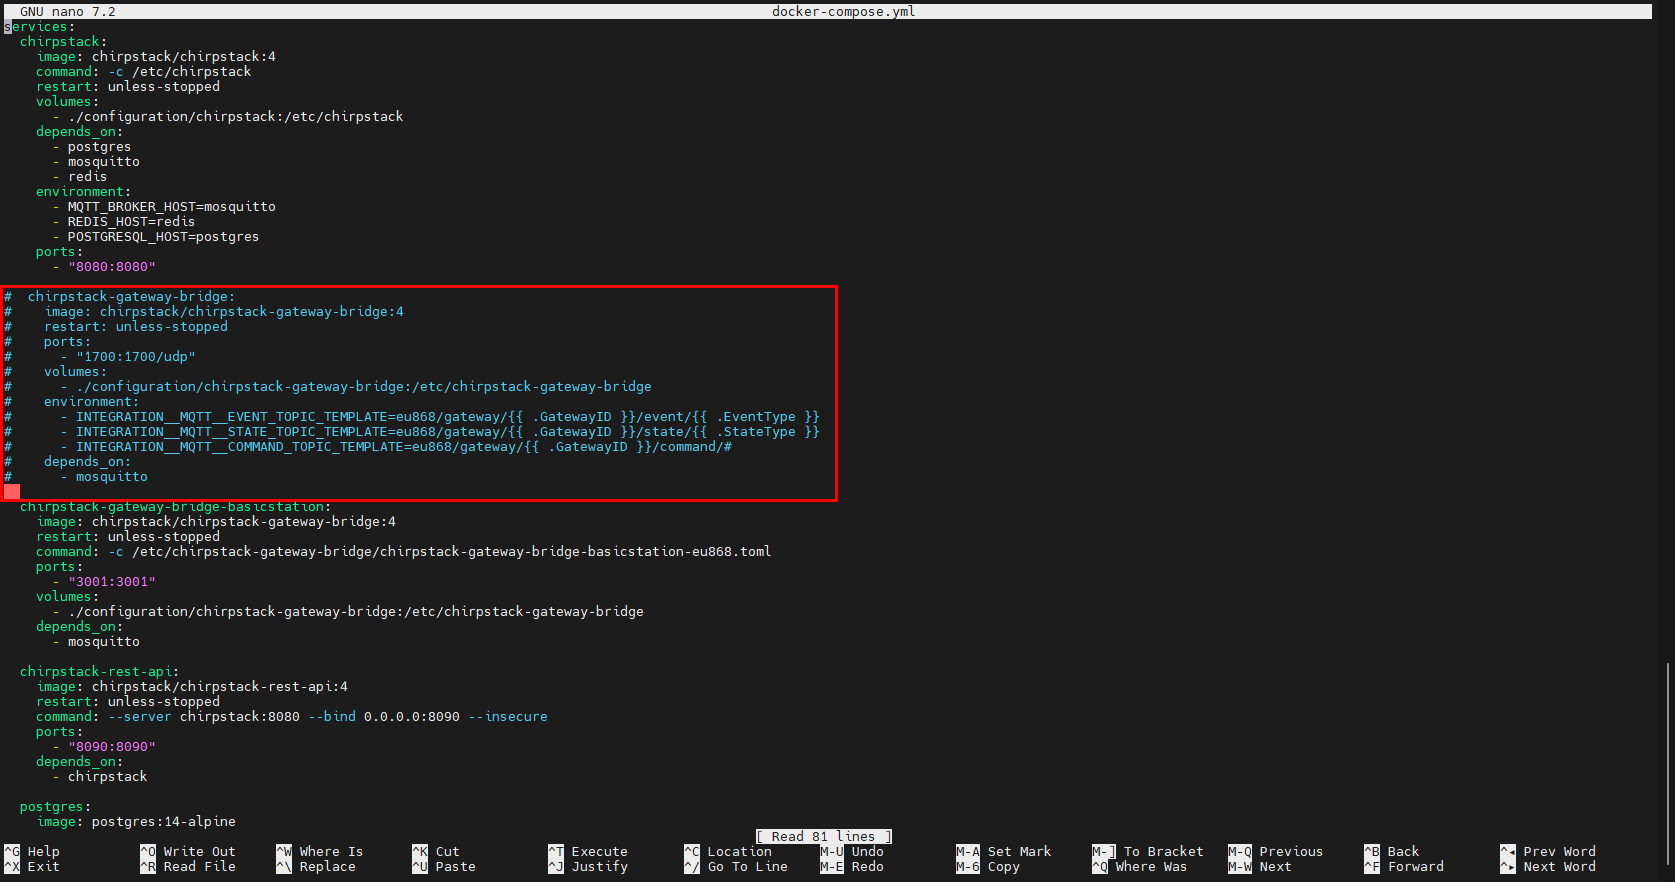
- 对
chirpstack-gateway-bridge部分进行注释。
services:
  chirpstack:
    image: chirpstack/chirpstack:4
    command: -c /etc/chirpstack
    restart: unless-stopped
    volumes:
      - ./configuration/chirpstack:/etc/chirpstack
    depends_on:
      - postgres
      - mosquitto
      - redis
    environment:
      - MQTT_BROKER_HOST=mosquitto
      - REDIS_HOST=redis
      - POSTGRESQL_HOST=postgres
    ports:
      - "8080:8080"

#  chirpstack-gateway-bridge:
#    image: chirpstack/chirpstack-gateway-bridge:4
#    restart: unless-stopped
#    ports:
#      - "1700:1700/udp"
#    volumes:
#      - ./configuration/chirpstack-gateway-bridge:/etc/chirpstack-gateway-bridge
#    environment:
#      - INTEGRATION__MQTT__EVENT_TOPIC_TEMPLATE=eu868/gateway/{{ .GatewayID }}/event/{{ .EventType }}
#      - INTEGRATION__MQTT__STATE_TOPIC_TEMPLATE=eu868/gateway/{{ .GatewayID }}/state/{{ .StateType }}
#      - INTEGRATION__MQTT__COMMAND_TOPIC_TEMPLATE=eu868/gateway/{{ .GatewayID }}/command/#
#    depends_on:
#      - mosquitto

  chirpstack-gateway-bridge-basicstation:
    image: chirpstack/chirpstack-gateway-bridge:4
    restart: unless-stopped
    command: -c /etc/chirpstack-gateway-bridge/chirpstack-gateway-bridge-basicstation-eu868.toml
    ports:
      - "3001:3001"
    volumes:
      - ./configuration/chirpstack-gateway-bridge:/etc/chirpstack-gateway-bridge
    depends_on:
      - mosquitto

  chirpstack-rest-api:
    image: chirpstack/chirpstack-rest-api:4
    restart: unless-stopped
    command: --server chirpstack:8080 --bind 0.0.0.0:8090 --insecure
    ports:
      - "8090:8090"
    depends_on:
      - chirpstack

  postgres:
    image: postgres:14-alpine
    restart: unless-stopped
    volumes:
      - ./configuration/postgresql/initdb:/docker-entrypoint-initdb.d
      - postgresqldata:/var/lib/postgresql/data
    environment:
      - POSTGRES_USER=chirpstack
      - POSTGRES_PASSWORD=chirpstack
      - POSTGRES_DB=chirpstack

  redis:
    image: redis:7-alpine
    restart: unless-stopped
    command: redis-server --save 300 1 --save 60 100 --appendonly no
    volumes:
      - redisdata:/data

  mosquitto:
    image: eclipse-mosquitto:2
    restart: unless-stopped
    ports:
      - "1883:1883"
    volumes:
      - ./configuration/mosquitto/config/:/mosquitto/config/

volumes:
  postgresqldata:
  redisdata:
提示
用户可通过修改mosquitto部分配置mqtt服务。
4.6.4 启动chirpstack服务端
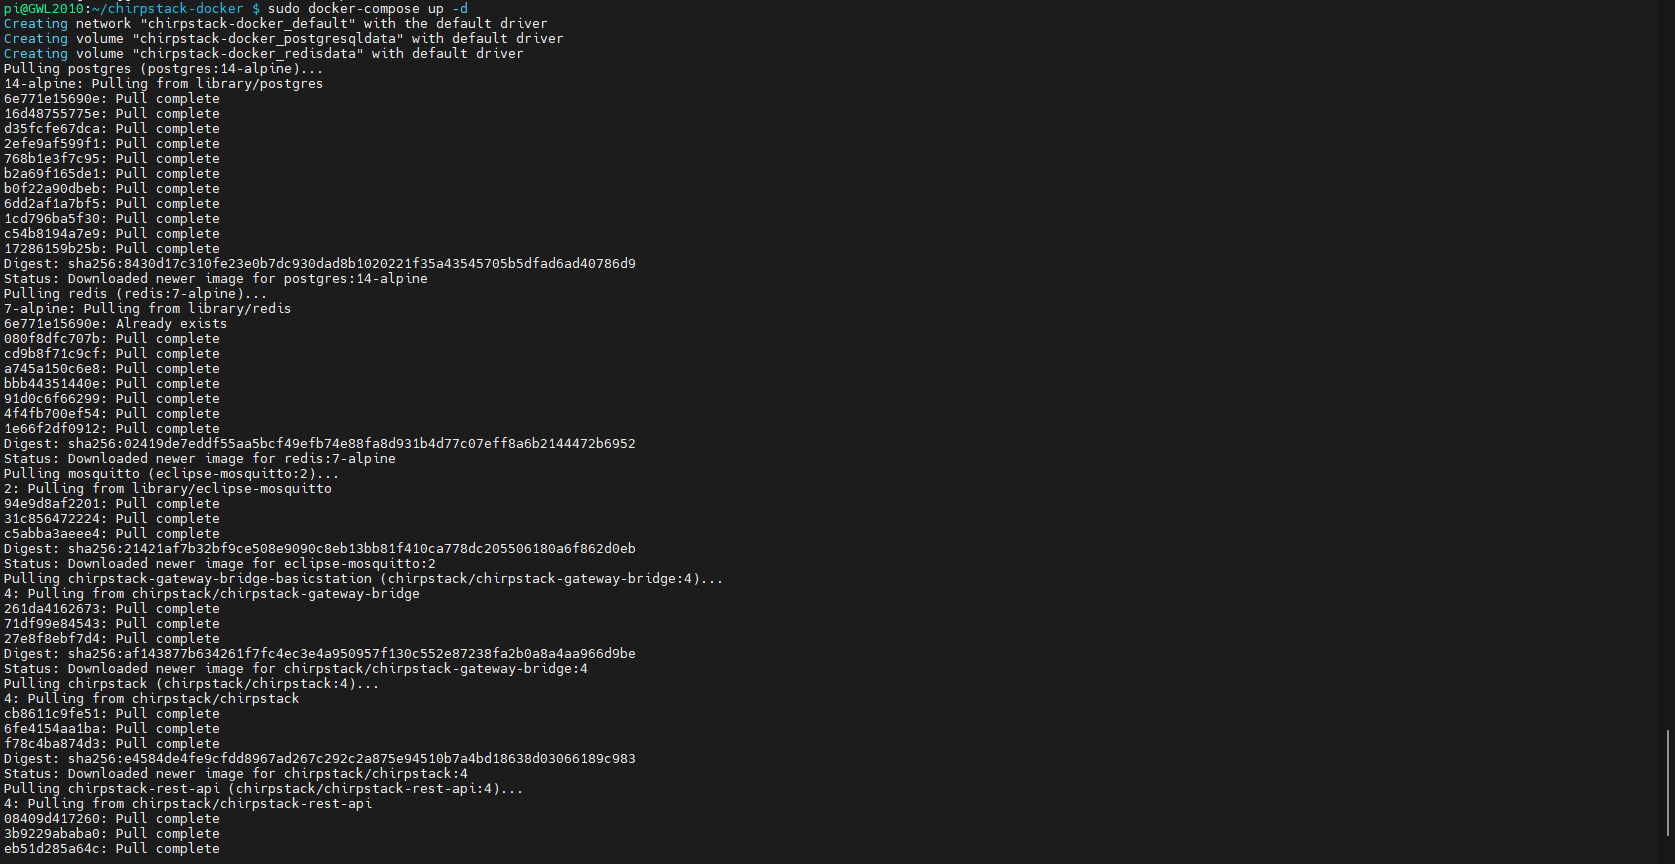
执行如下命令,在部署chirpstack服务端的设备上启动chirpstack服务端。
sudo docker-compose up -d
4.6.5 登录chirpstack服务管理界面
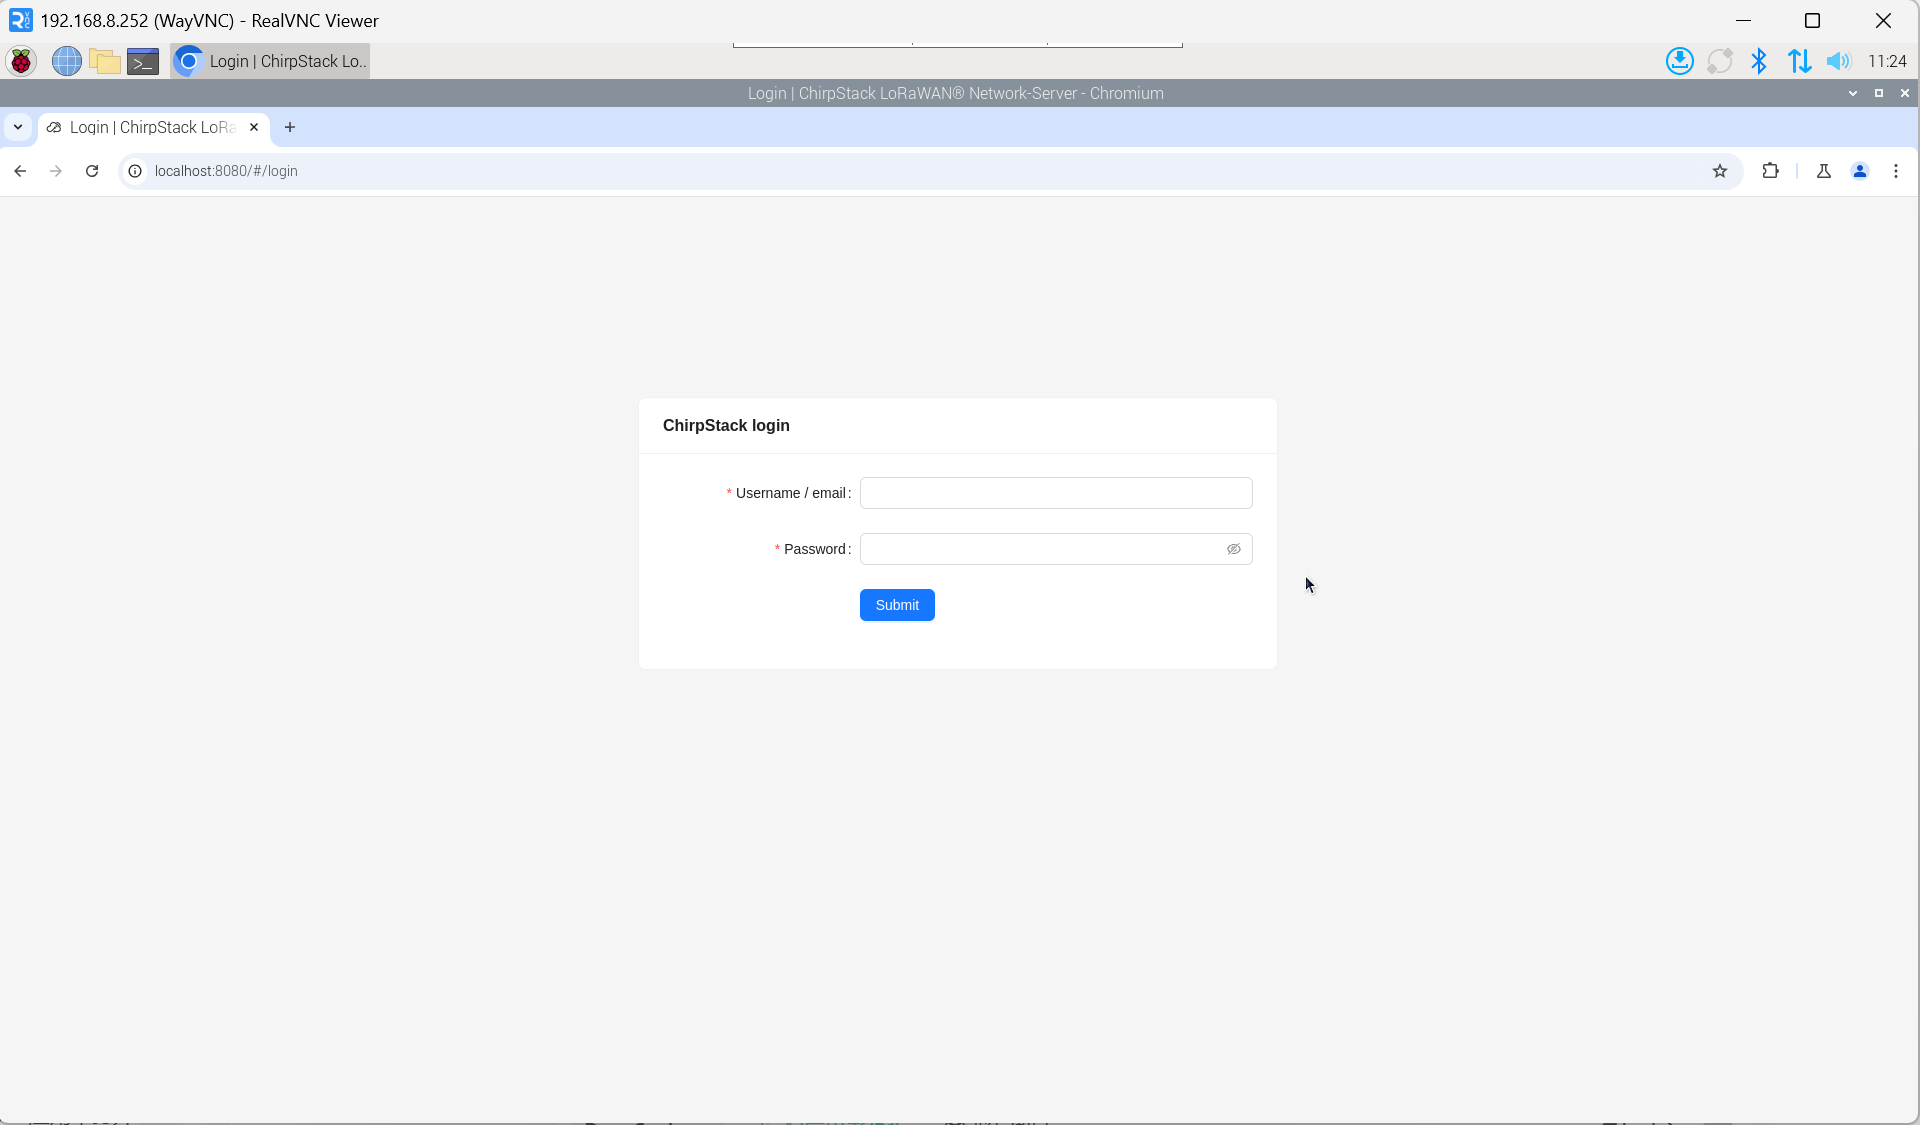
4.6.5.1 浏览器登录
- 在PC端浏览器输入服务器的IP地址和端口号:http://localhost:8080,

- 在登录界面输入用户名和密码。
提示
默认的用户名为admin,默认密码为admin。
4.6.5.2 获取LoRa网关ID
- 执行如下命令,查看对应的LoRa文件。
systemctl status ed-lora.service
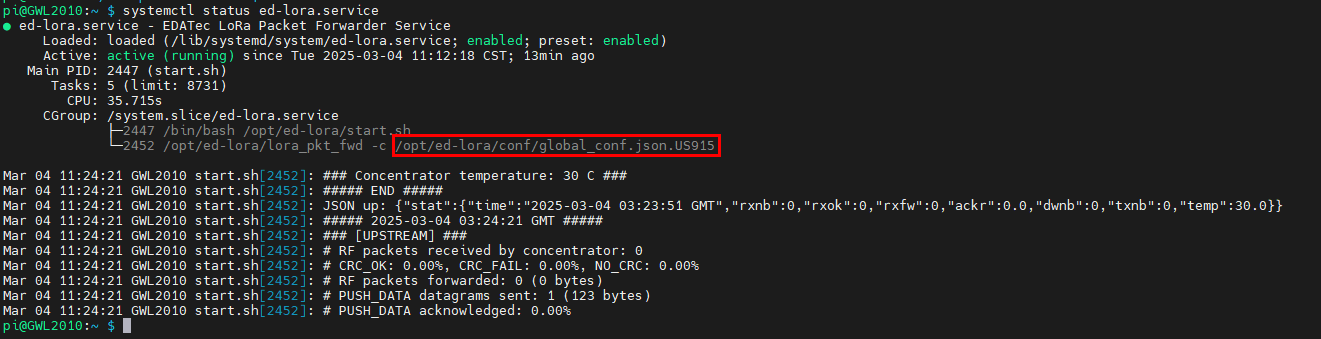
- 执行如下命令,查看LoRa网关的ID。
cat /opt/ed-lora/conf/global_conf.json.US915 | grep gateway

提示
在chirpstack服务端添加LoRa网关时,需要填加对应的网关ID。
4.6.5.3 添加LoRa网关
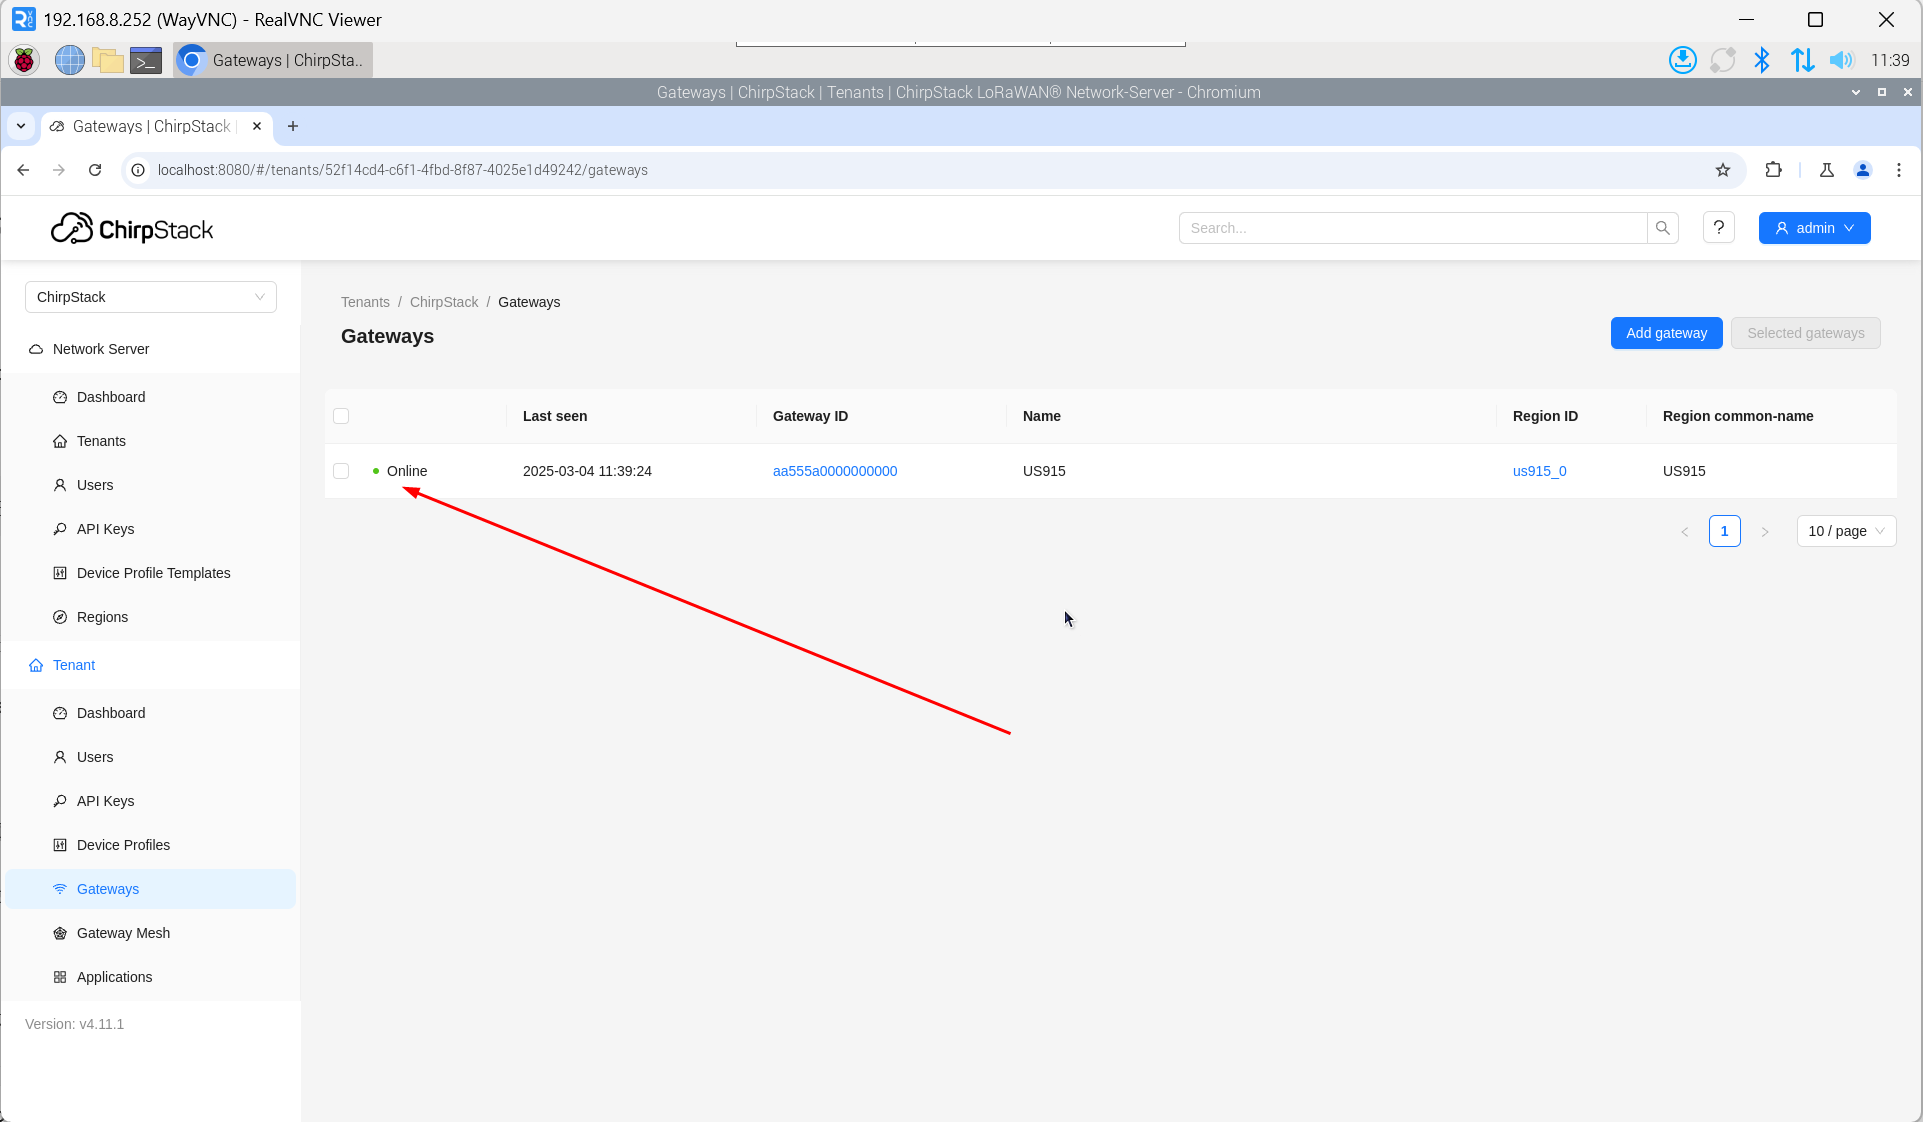
- 在PC端浏览器打开chirpstack管理界面,单击“Gateway” -> “Add gateway”。
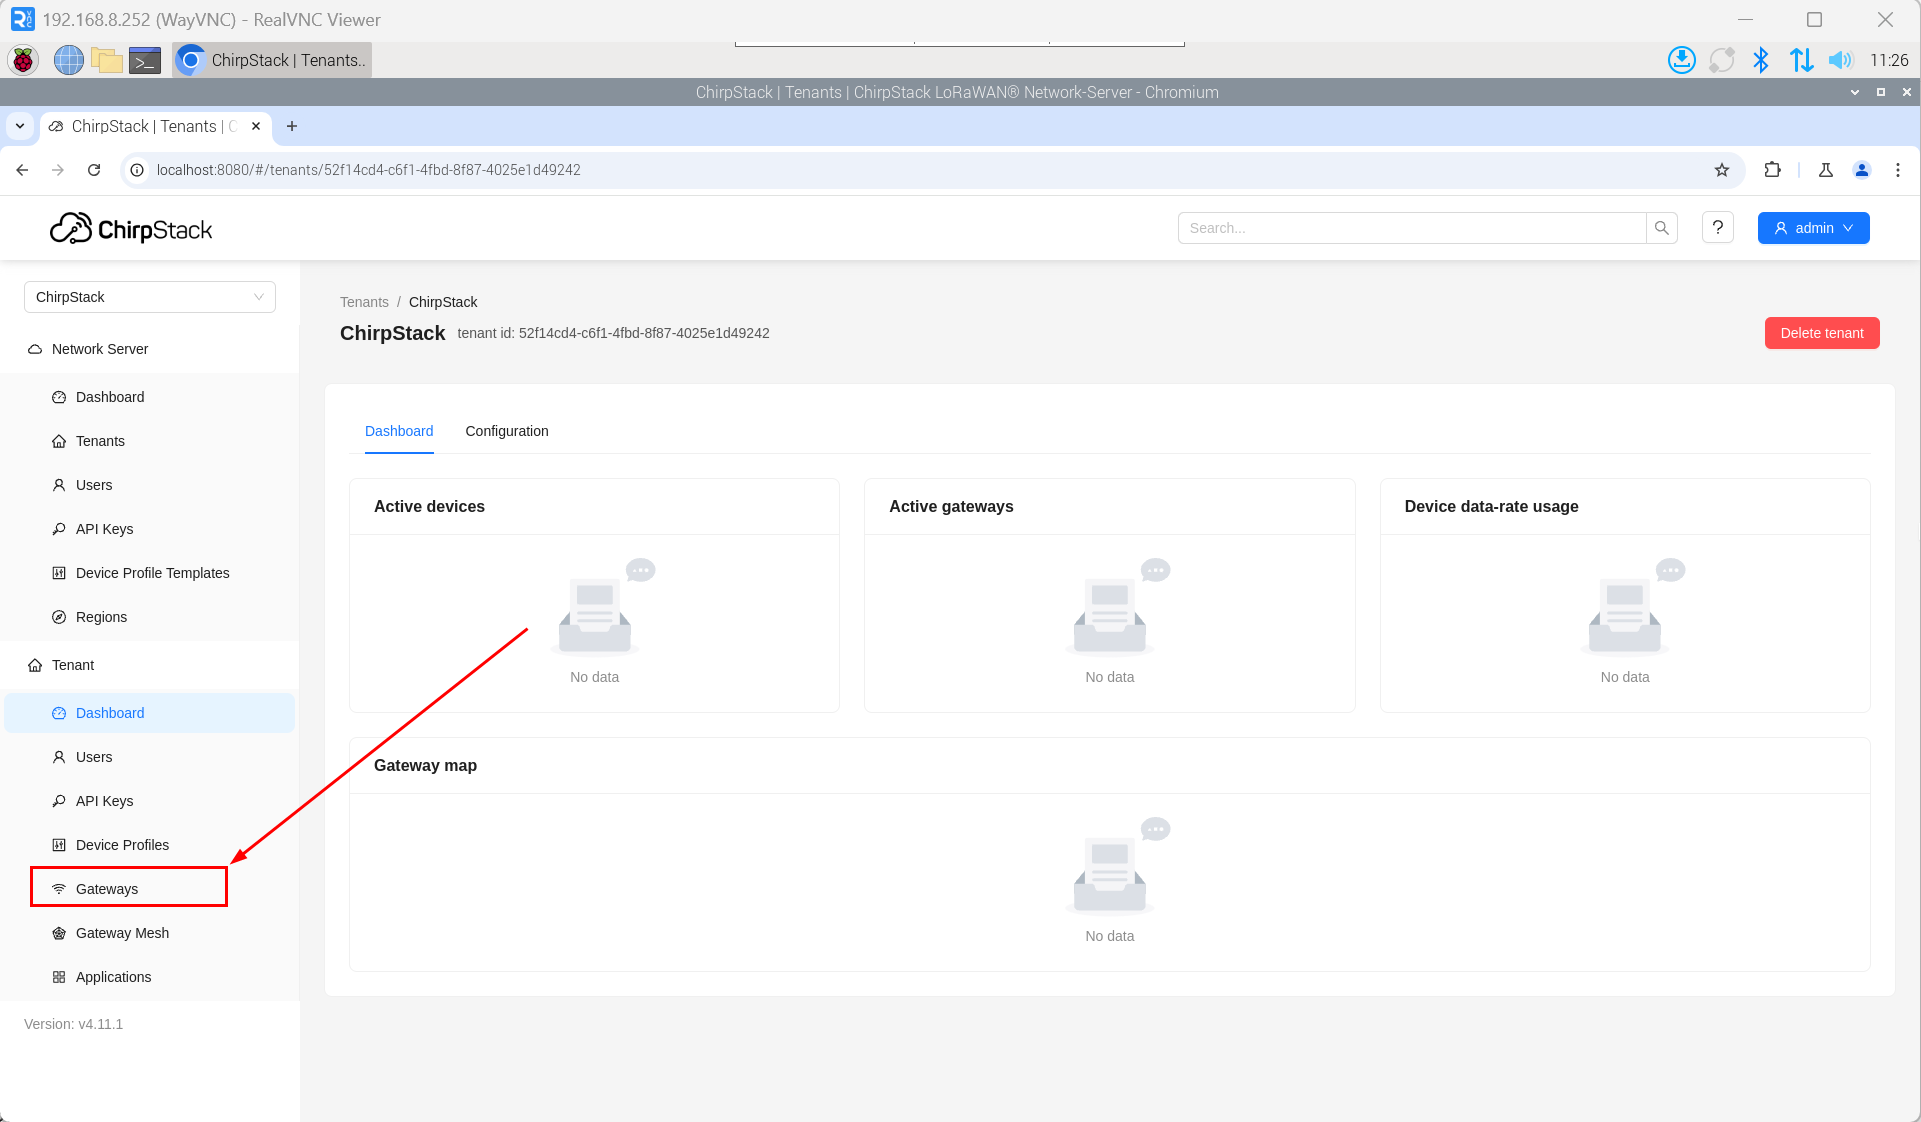
- 单击“add”。
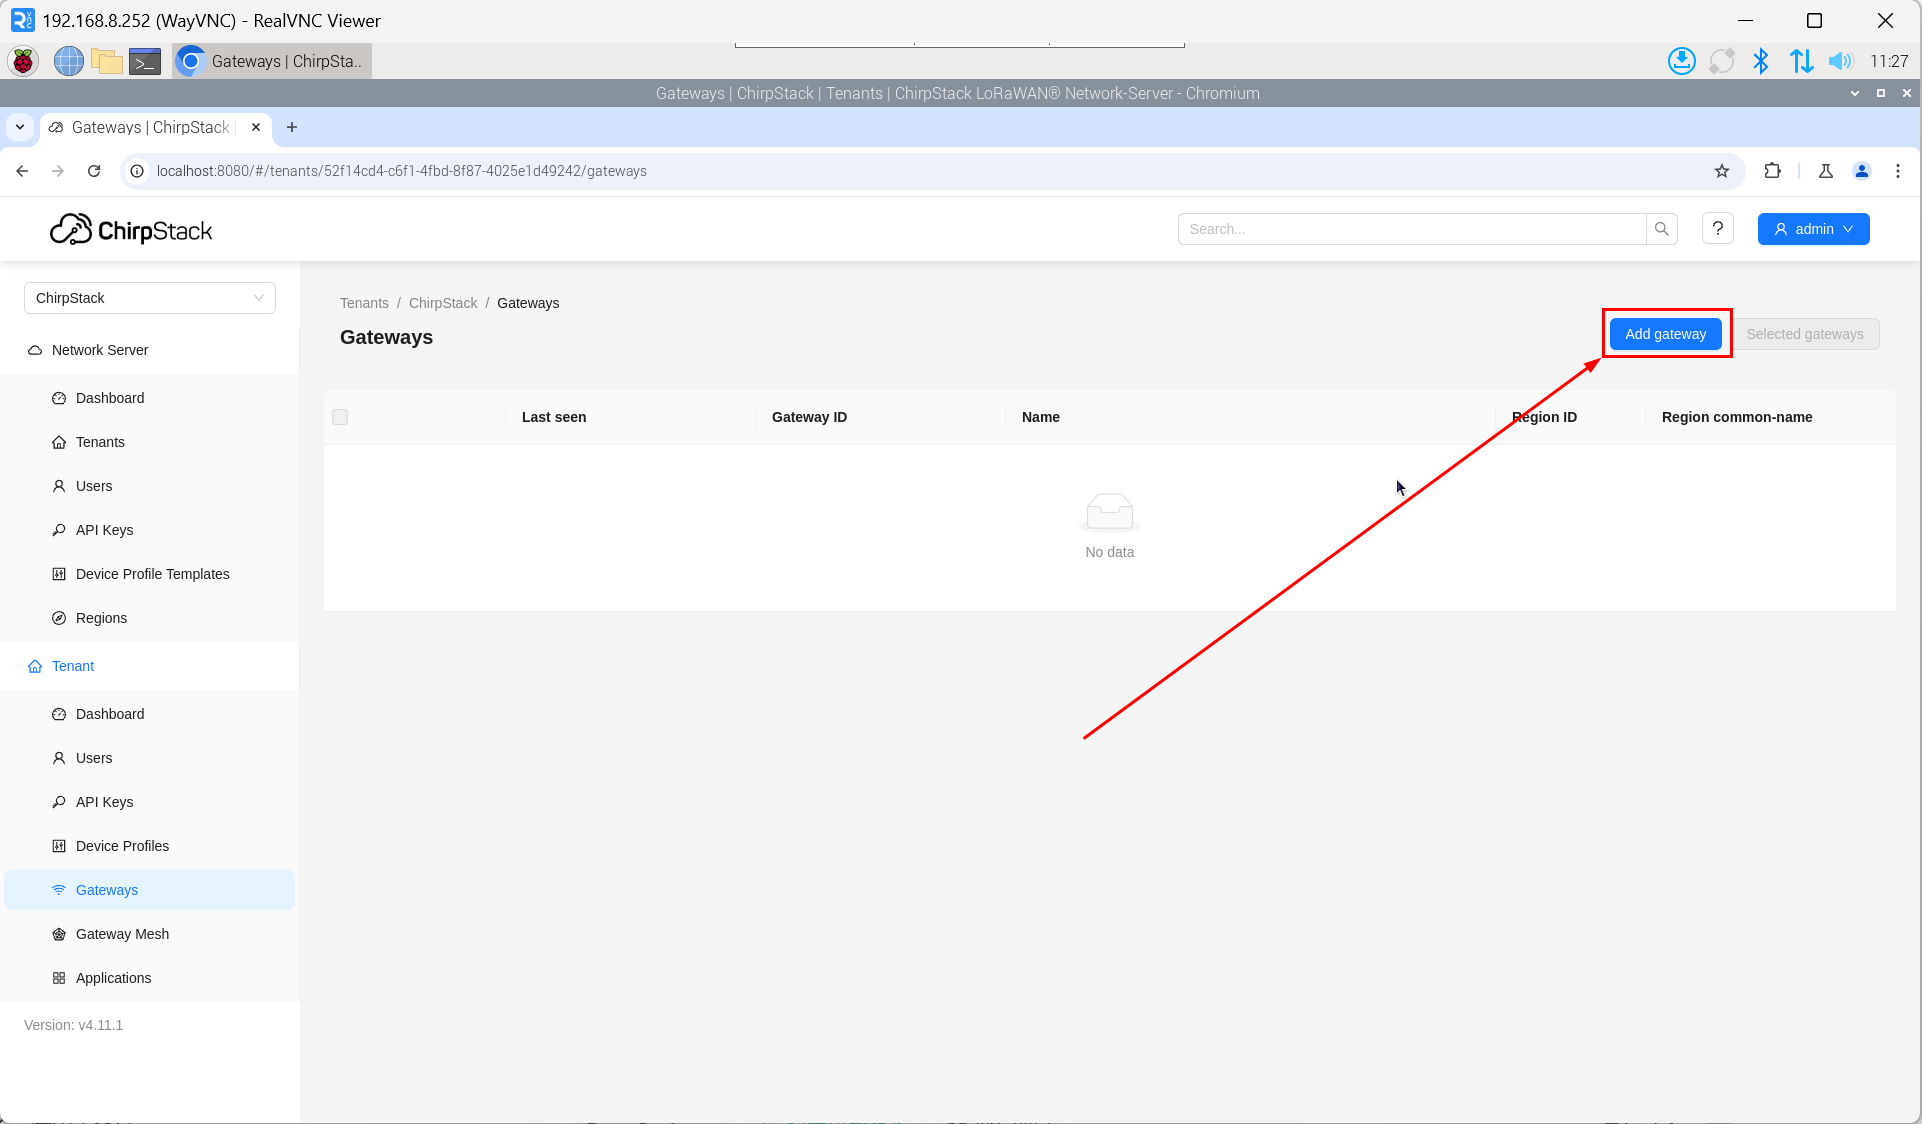
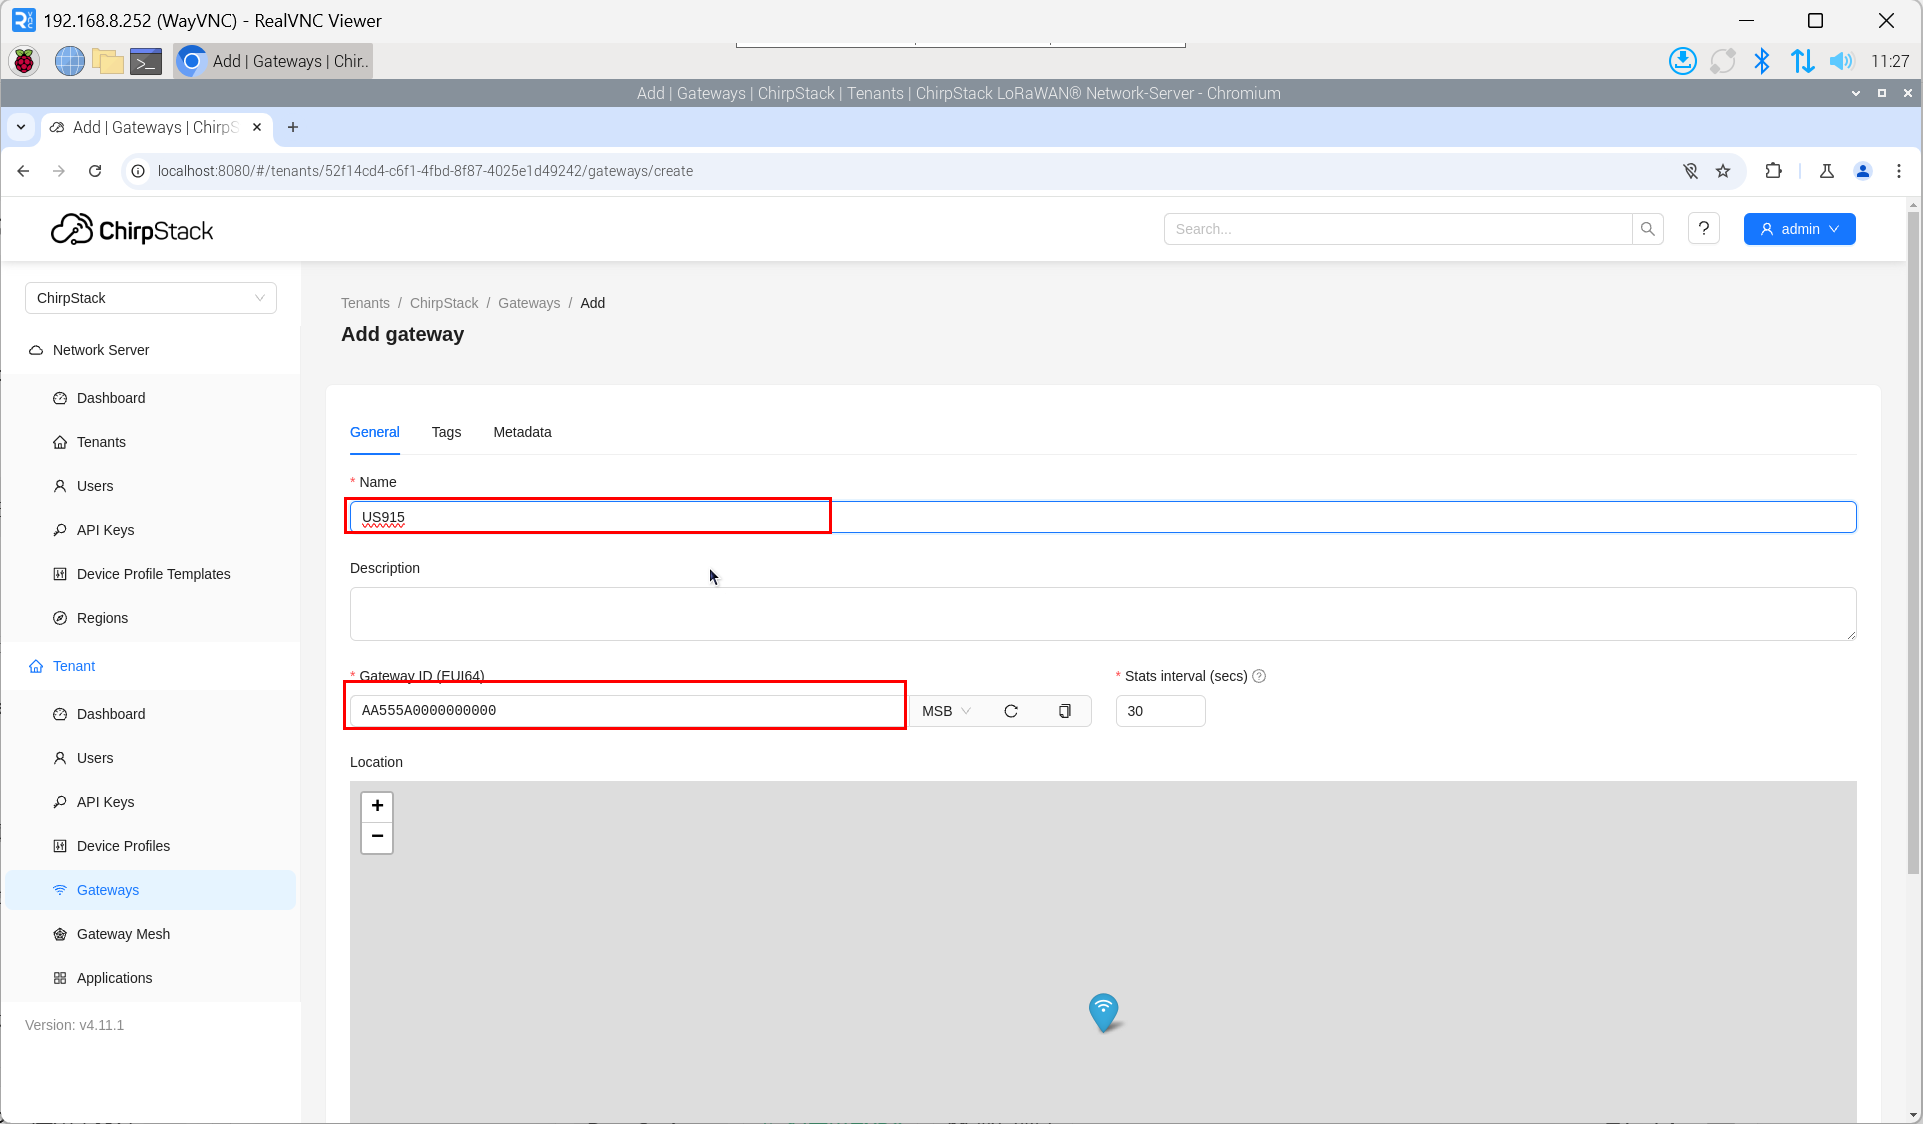
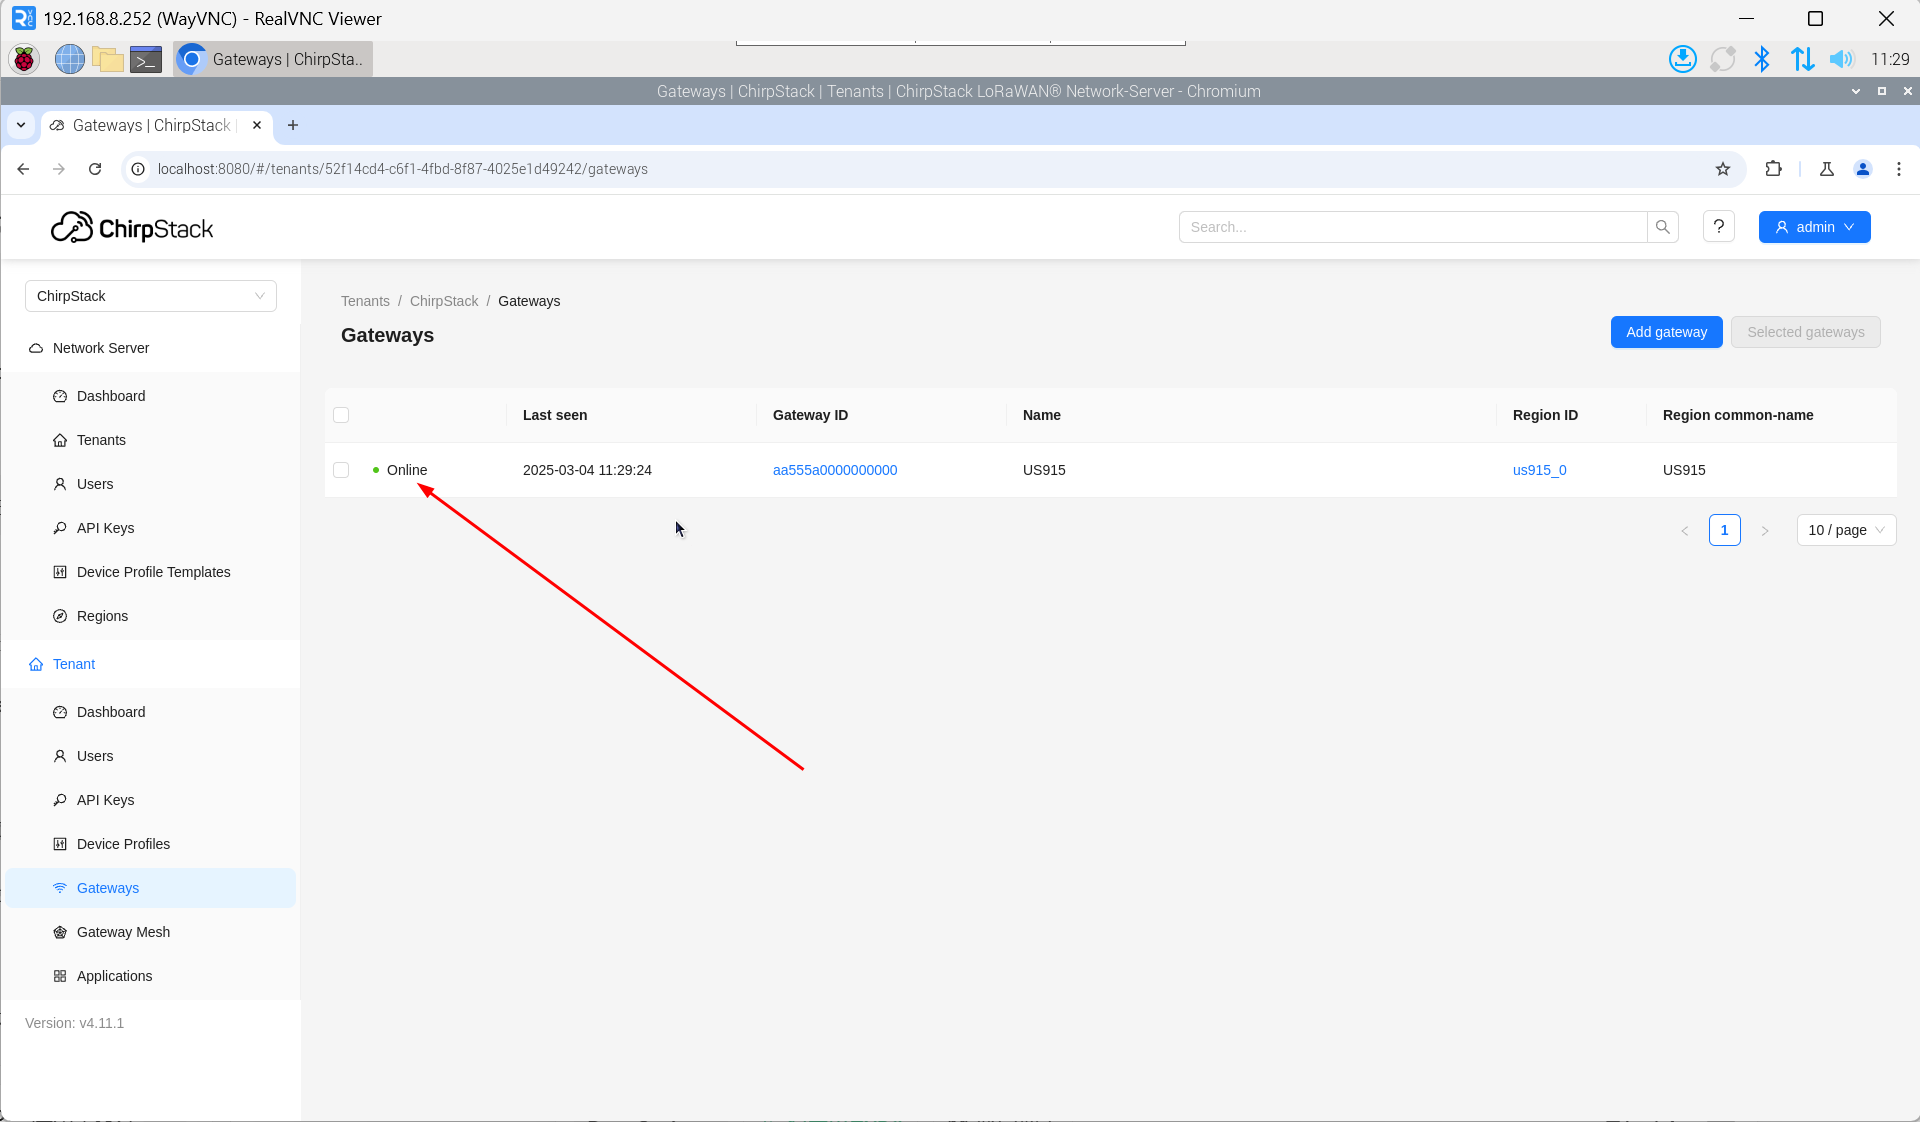
- 填入设备对应的Gateway ID,并设置Name,然后单击“Submit”。如果网络连接正确,稍等片刻即可看到添加的网关变为Online状态。
4.6.5.4 添加设备配置
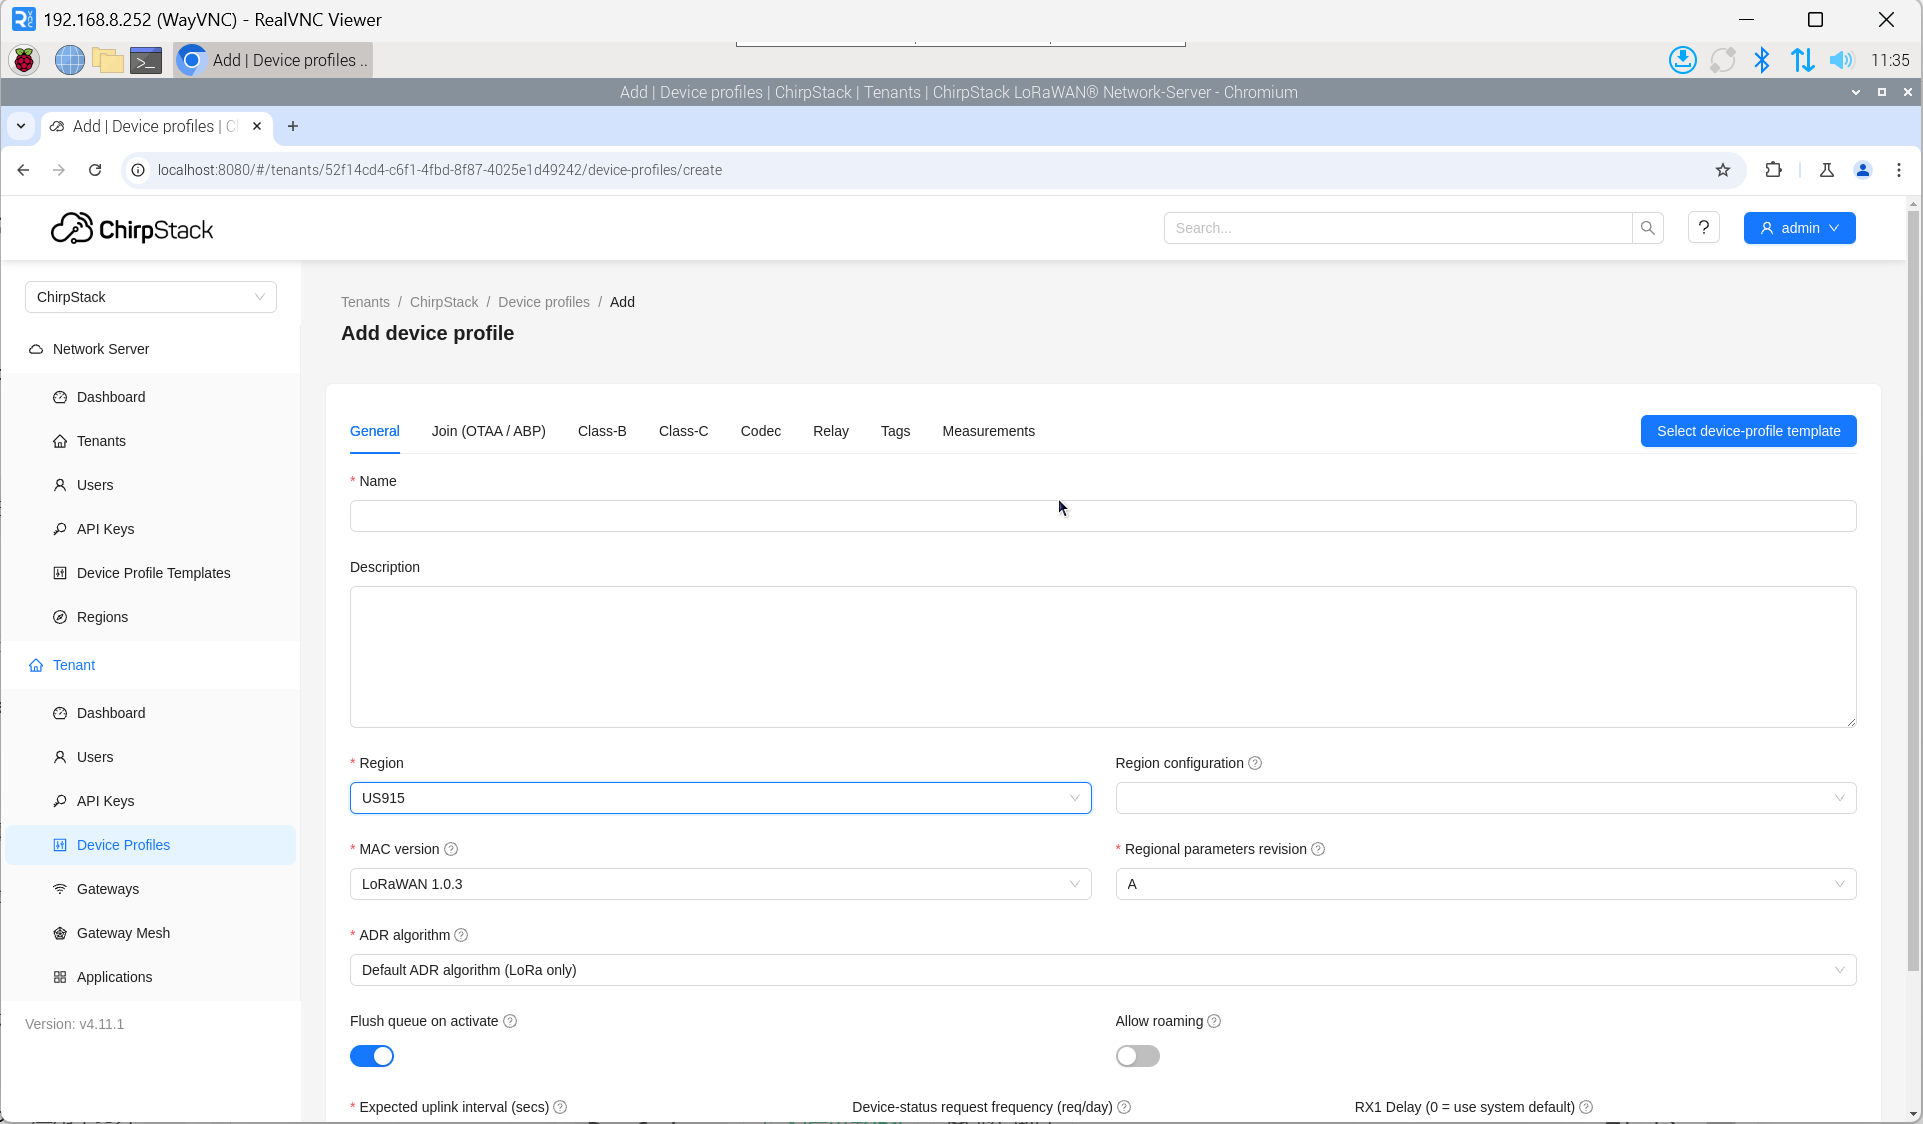
单击“Device Profile” -> “Add device profile”,补充设备信息。
4.6.4.5 添加应用
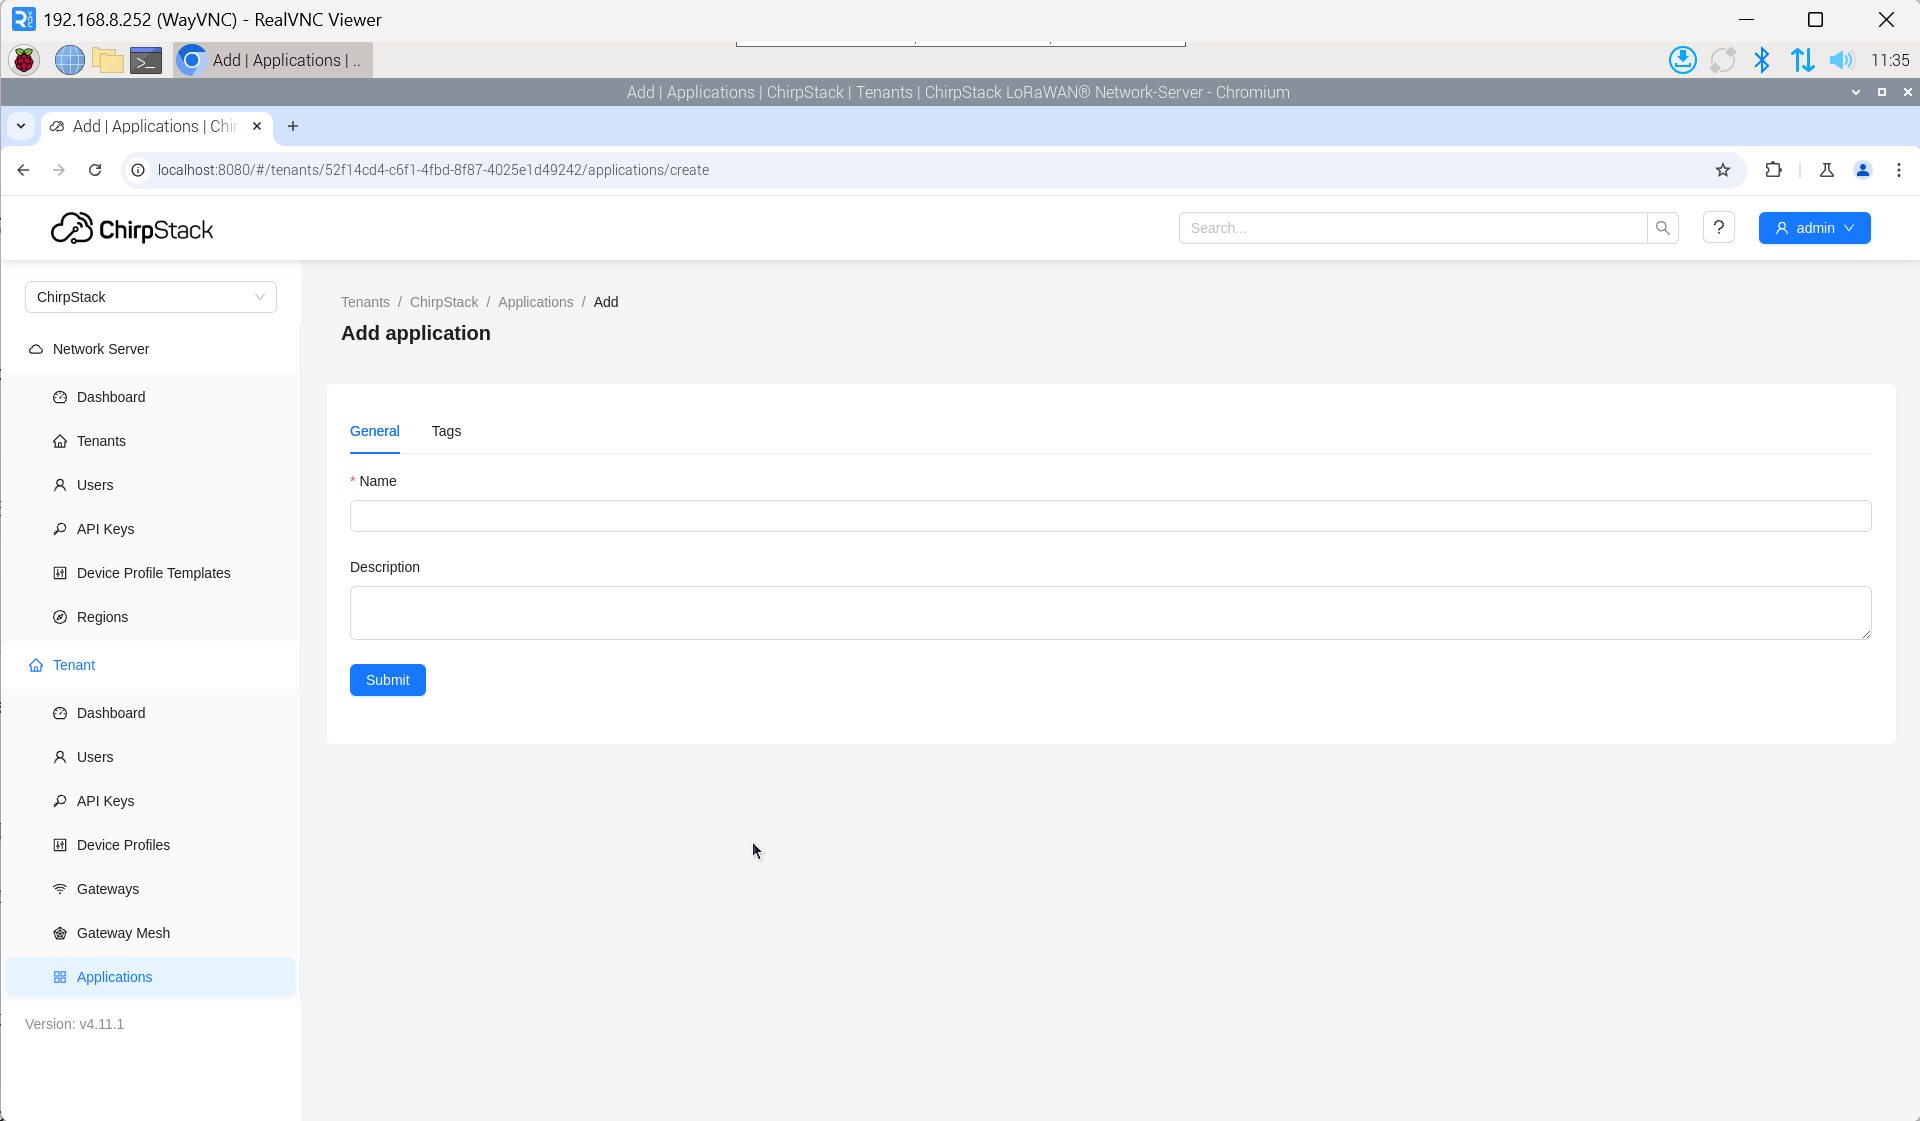
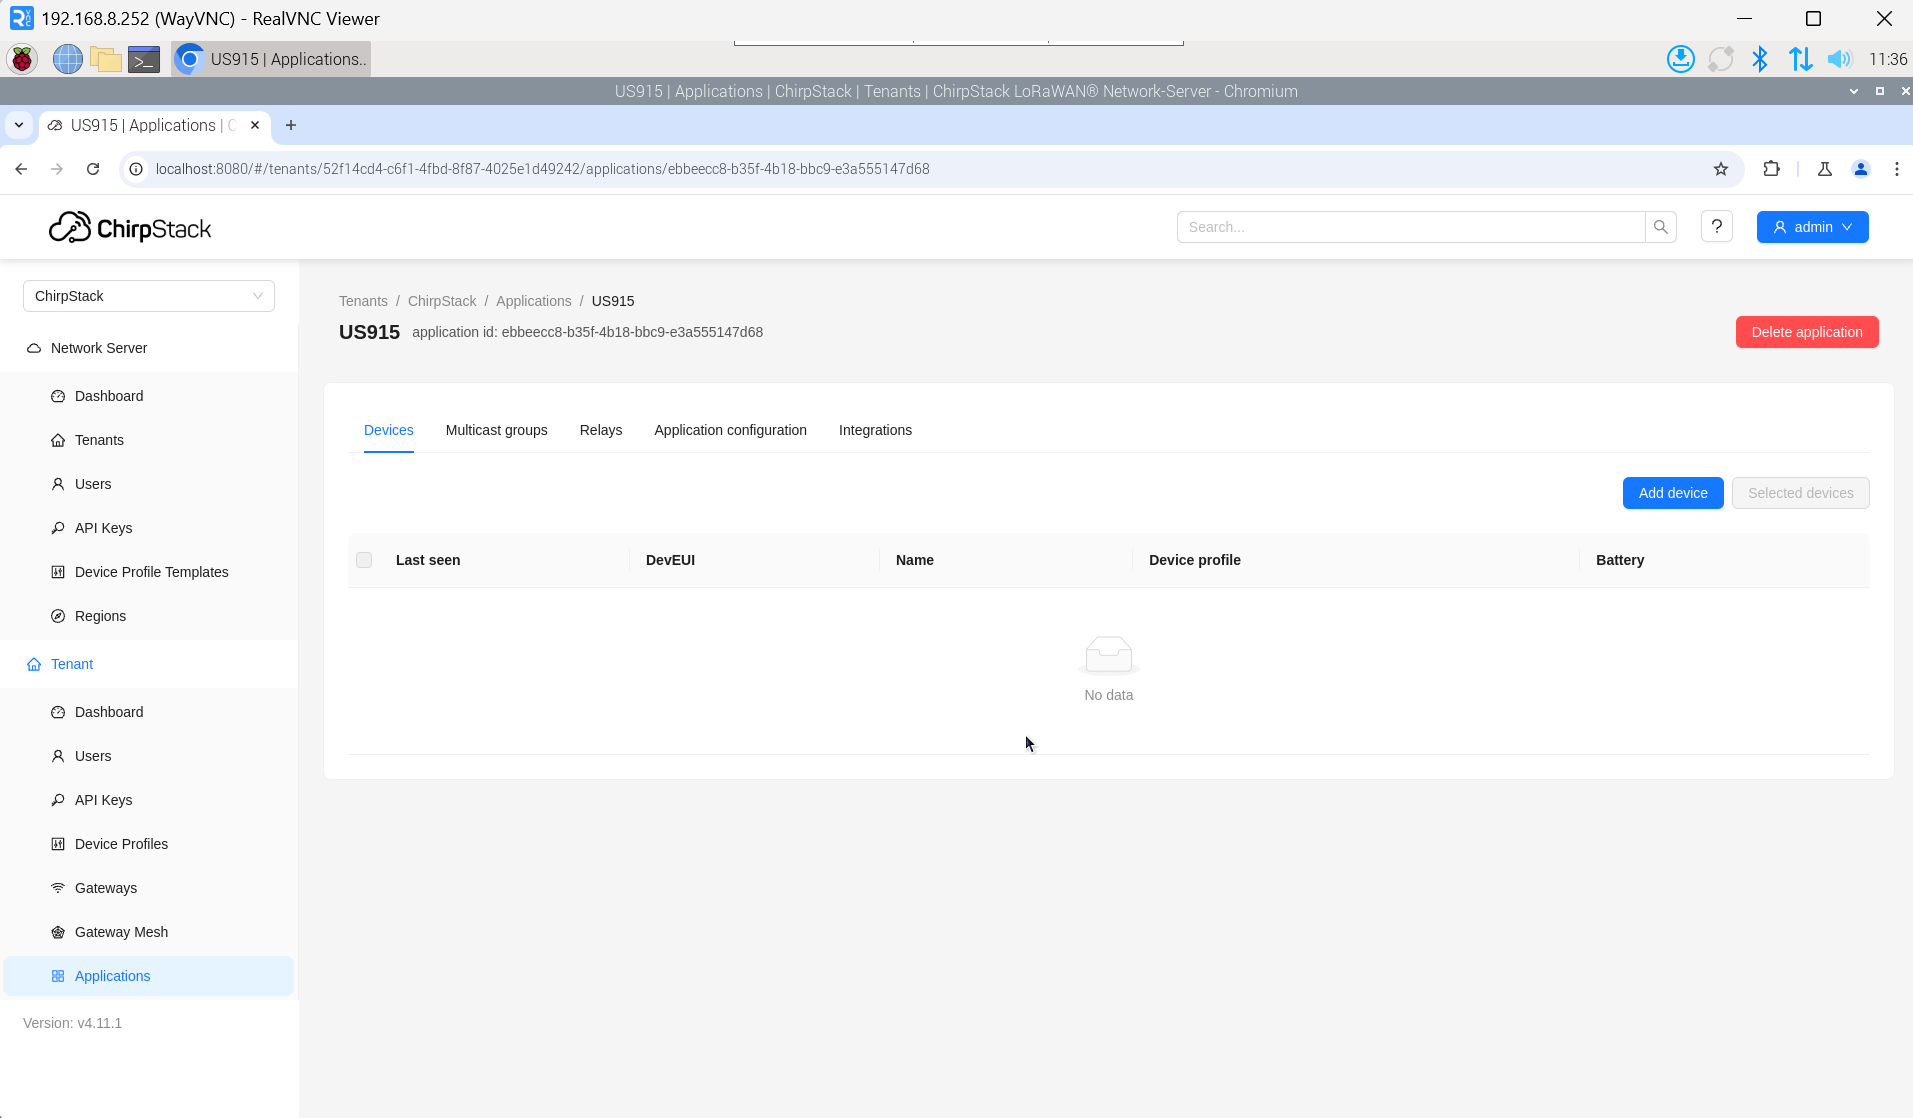
单击“Applications” -> “Add application”。
4.6.4.6 添加设备
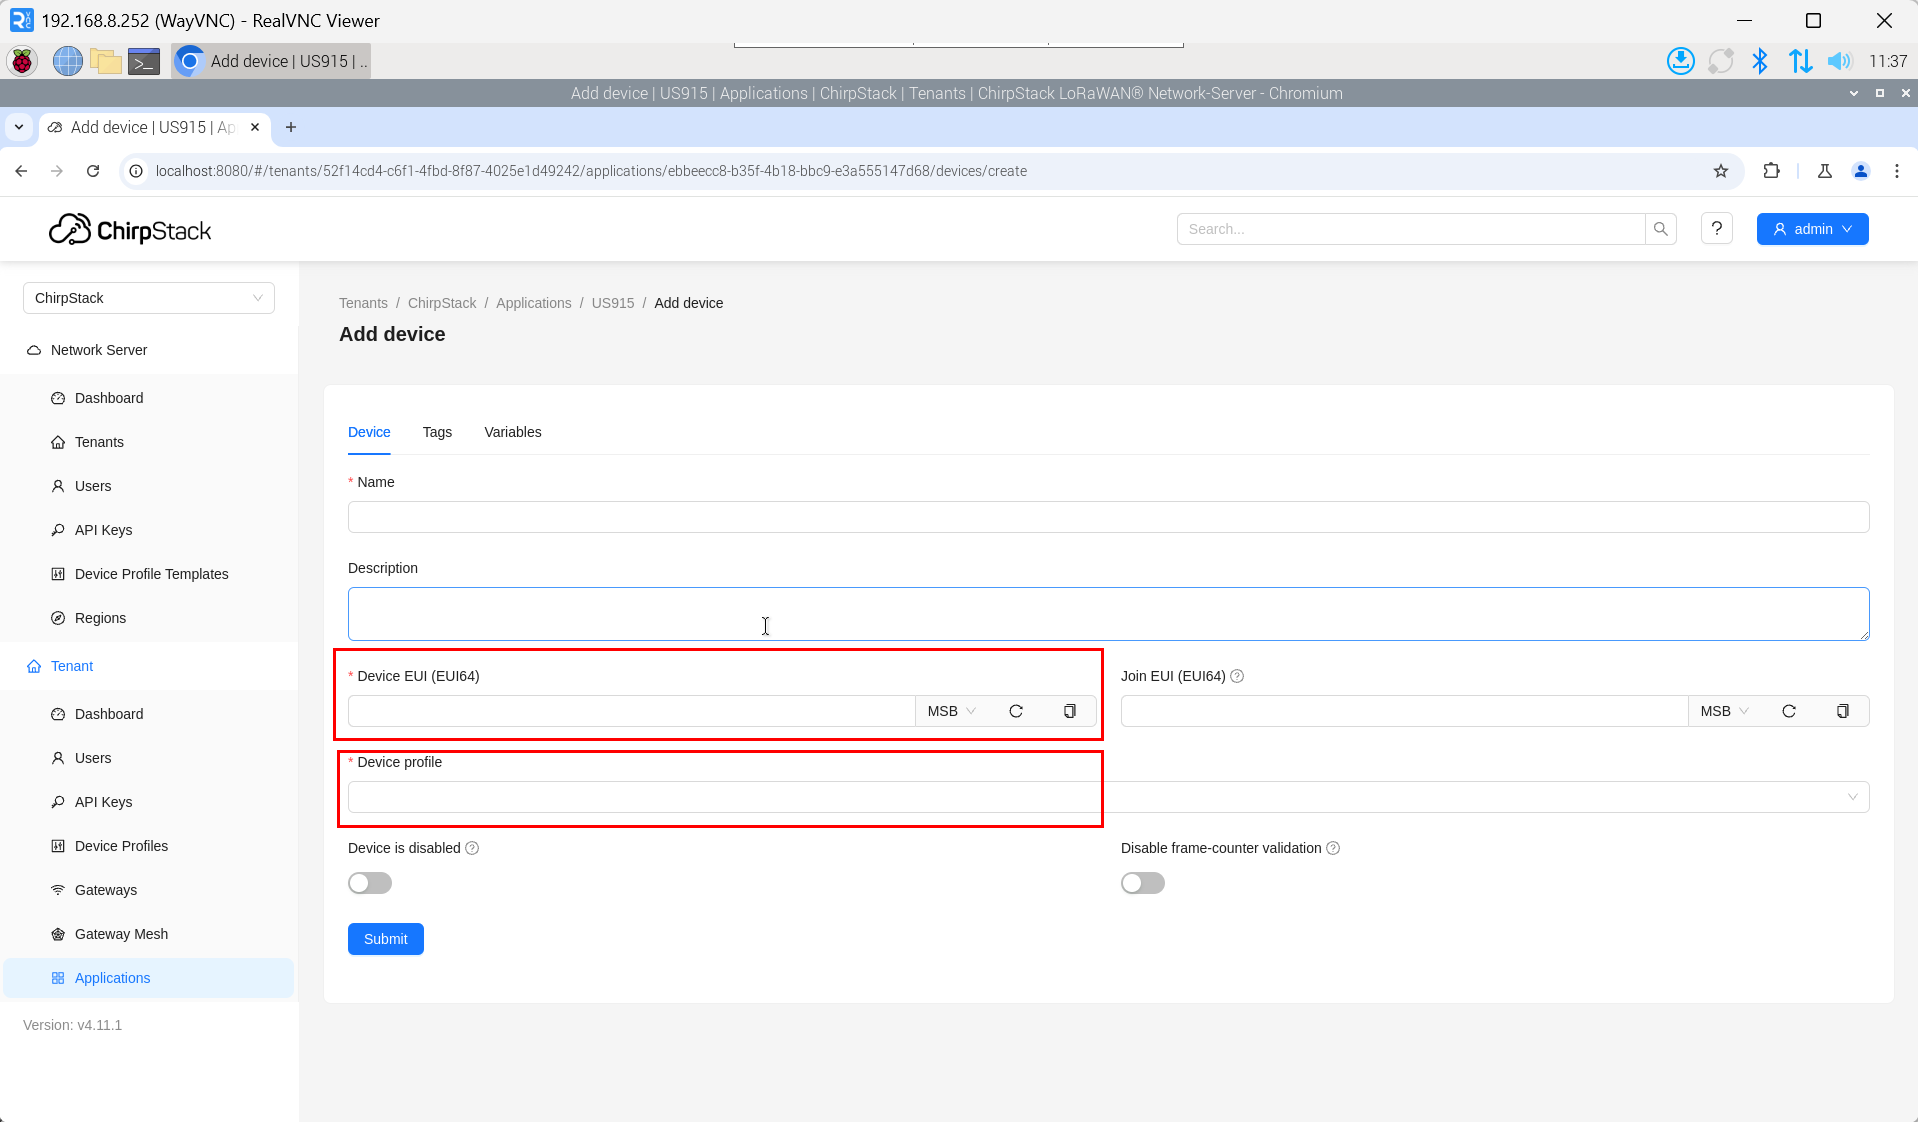
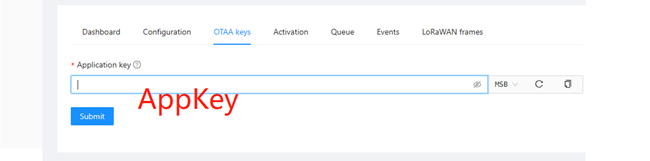
LoRa终端产品的DevEUI和AppKey均由LoRa终端设备制造商提供。
- 单击“Application” -> “your application” -> “Add device”,添加LoRa终端设备。
- 等待几分钟后,可看到设备变成online状态。