4 Configuring System
This chapter introduces how to configure system.
4.1 Finding Device IP
4.2 Remote Login
4.3 Configuring Storage Devices
4.4 Configuring Wi-Fi (Optional)
4.5 Configuring Ethernet IP
4.6 Configuring Bluetooth (Optional)
4.7 Configuring 4G (Optional)
4.8 Configuring Buzzer
4.9 Configuring RTC
4.10 Configuring Serial Port
This chapter introduces the configuration method of RS232 and RS485.
4.10.1 Installing picocom tool
In the Linux environment, you can use the picocom tool to debug the serial ports RS232 and RS485.
Execute the following command to install the picocom tool.
sudo apt-get install picocom
4.10.2 Configuring RS232
ED-SBC2300 series single-board includes 6 RS232 ports, and the corresponding COM ports and device files are as follows:
| COM port | Silkscreen in PCBA | Corresponding Device File |
|---|---|---|
| JCOM1 | J8 | /dev/com1 |
| JCOM2 | J9 | /dev/com2 |
| JCOM3 | J10 | /dev/com3 |
| JCOM4 | J11 | /dev/com4 |
| JCOM5 | J12 | /dev/com5 |
| JCOM6 | J13 | /dev/com6 |
Preparation:
The RS232 port of ED-SBC2300 has been connected with external device.
Steps:
- Execute the following command to open the serial port com1, and configure the serial port baud rate to 115200.
picocom -b 115200 /dev/com1
- Input commands as needed to control external device.
4.10.3 Configuring RS485
ED-SBC2300 includes 2 RS485 ports, and the corresponding COM ports and device files are as follows::
| COM port | Silkscreen in PCBA | Corresponding Device File |
|---|---|---|
| RS485_1 | J16 | /dev/rs485_1 |
| RS485_2 | J17 | /dev/rs485_2 |
Preparation:
The RS485 port of ED-SBC2300 has been connected with external device.
Steps
- Execute the following command to open the serial port RS485_1,and configure the serial port baud rate to 115200.
picocom -b 115200 /dev/rs485_1
- Input commands as needed to control external device.
4.11 Configuring Audio (optional)
ED-SBC2300 series single-board contains one audio input (supports access to MIC) and one audio output. The volume of Master and MIC can be adjusted, and it supports audio recording of MIC.
4.11.1 Adjusting The Volume
It supports manual adjustment of MIC and Master volume.
- Adjusting the volume of MIC and Master through desktop icons.
Steps
Click the icon
 or
or  ,in the upper right corner of the desktop to open the volume adjustment colume.
Drag the button of the volume adjustment column up and down to adjust the volume, check or uncheck the Mute check box to mute and unmute the audio.
- Opening the volume adjustment interface through the command line to adjust the volume.
Steps:
- Execute the following command to open the volume adjustment interface.
alsamixer
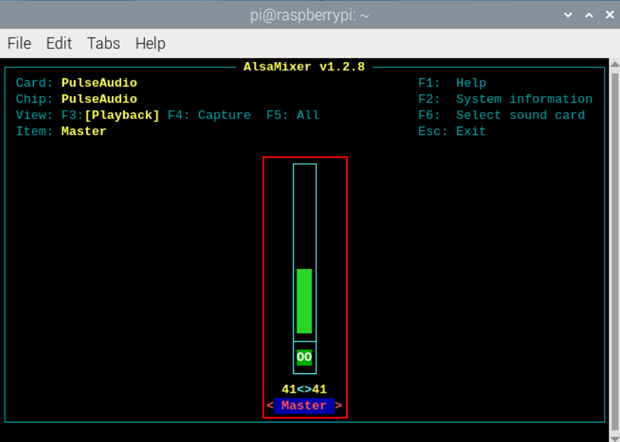
- View the volume value of the current Master in the opened interface. You can adjust the volume through the ↑ key and ↓ key on the keyboard, and press the M key to mute and unmute the audio.
| Keyboard Key | Function |
|---|---|
| ↑ | Volume+ |
| ↓ | Volume- |
| M | Mute or Unmute |
4.11.2 Configuring Recording
It supports the audio recording of MIC input.
Preparation:
The audio input interface is connected to the MIC, and the MIC is not muted.
Steps:
- Open command pane,execute the following command to start recording audio named name.wav, as shown in the figure below.
arecord -fdat -Dhw:0--vumeter=stereo name.wav

| Parameters | Description |
|---|---|
| dat | Indicating the audio format, and only supports recording in **dat** format. |
| 0 |  |
| name.wav | Indicating the recorded file name, which can be customized by the user. |
- Input Ctrl+C to save and close the recording.
- Execute the following command to obtain the storage path of the recording file.
pwd