Installing and Using 4G Dial-up Reconnection Software
Notes
Current Version: A
Revision History
| Version | Description | Date |
|---|---|---|
| A | Initial Version | 2025.12.26 |
1 Overview
Introduces installing and using 4G dial-up reconnection software on products such as the ED-IPC and ED-HMI series.
1.1 Background
Some customers often encounter issues where the 4G connection cannot automatically redial and reconnect after disconnection when using the 4G function of ED-IPC and ED-HMI series products, leading to unstable 4G signals. To address this issue, our company has developed 4G reconnection software to help users better achieve automatic 4G connection.
Our 4G dial-up reconnection software package supports dialing using Quectel QMI service. Its main functions are as follows:
- Supports automatic 4G connection
- Supports controlling the 4G indicator
- Supports configuring 4G module reset
- Supports configuring APN
- Supports configuring network priority
- Supports custom ping network connection status detection conditions
TIP
- The 4G dial-up reconnection software package uses Quectel QMI dialing by default.
- The 4G dial-up reconnection software will be continuously developed and updated.
1.2 Scope of Application
This application applies to all ED-IPC and ED-HMI series products with 4G functionality. The specific product models included are as follows:
| Category | Product Models |
|---|---|
| ED-IPC | ED-IPC2100 ED-IPC2200 ED-IPC2600 ED-IPC3100 ED-IPC3200 ED-IPC3600 ED-CM4SEN ED-CM4IND ED-CM4MEDIA |
| ED-HMI | ED-HMI2120-070C ED-HMI2120-101C ED-HMI2220-070C ED-HMI2220-101C ED-HMI2630-101C ED-HMI3120-070C ED-HMI3120-101C ED-HMI3630-101C |
2 Application Guide
The following uses the ED-IPC2100 device as an example to introduce the specific operations for installing and using the 4G dial-up reconnection software.
2.1 Installing the 4G Dial-up Reconnection Software
TIP
If you have already installed an older version of our company's 4G dial-up reconnection software, there is no need to uninstall it separately. You can directly install the new version of the software.
Preparation:
- The ED-IPC2100 device has the 4G module correctly installed, the 4G antenna correctly installed, and a functional SIM card inserted.
- A 12V 2A power adapter and an Ethernet cable are prepared.
Steps:
The ED-IPC2100 device has started normally and is connected to the network.
Execute the following commands in sequence in a command window to add the edatec apt repository.
curl -sS https://apt.edatec.cn/pubkey.gpg | sudo gpg --dearmor -o /etc/apt/trusted.gpg.d/edatec-archive-stable.gpg
echo "deb https://apt.edatec.cn/raspbian stable main" | sudo tee /etc/apt/sources.list.d/edatec.list
sudo apt update
NOTE
If you copy and paste the command directly, and line breaks appear during pasting, please delete the line breaks and add a space in their place.

- Execute the following commands in sequence to install the 4G dial-up reconnection software package (ed-qmi-tool).
sudo apt install busybox
sudo apt install ed-qmi-tool
- Execute the following command to check if the 4G dial-up reconnection software package was installed successfully. The appearance of the content shown in the red box in the figure below indicates a successful installation.
dpkg -l | grep ed-

- After installation is complete, execute the following commands in sequence to start the 4G network connection service and enable the 4G service.
sudo systemctl start ed-lte-daemon.service
sudo systemctl enable ed-lte-daemon.service
2.2 Using the 4G Dial-up Reconnection Software to Connect to the Network
Introduces how to use the 4G dial-up reconnection software on the device.
2.2.1 Scenarios Without APN Configuration
After completing the installation of the 4G dial-up reconnection software package, if the user's 4G network does not require APN configuration, the 4G network will connect automatically. The user can check the 4G network status by following the steps below.
Preparation:
- The ED-IPC2100 has started normally.
- A Nano SIM card with 4G network service has been correctly installed into the device's SIM card slot.
NOTE
Please turn off the power before inserting or removing the Nano SIM card.
Steps:
- Open the command window and execute the following command to check if the 4G network is connected.
ifconfig
The returned information is as shown in the figure below (the wwan0 interface indicates the 4G interface):
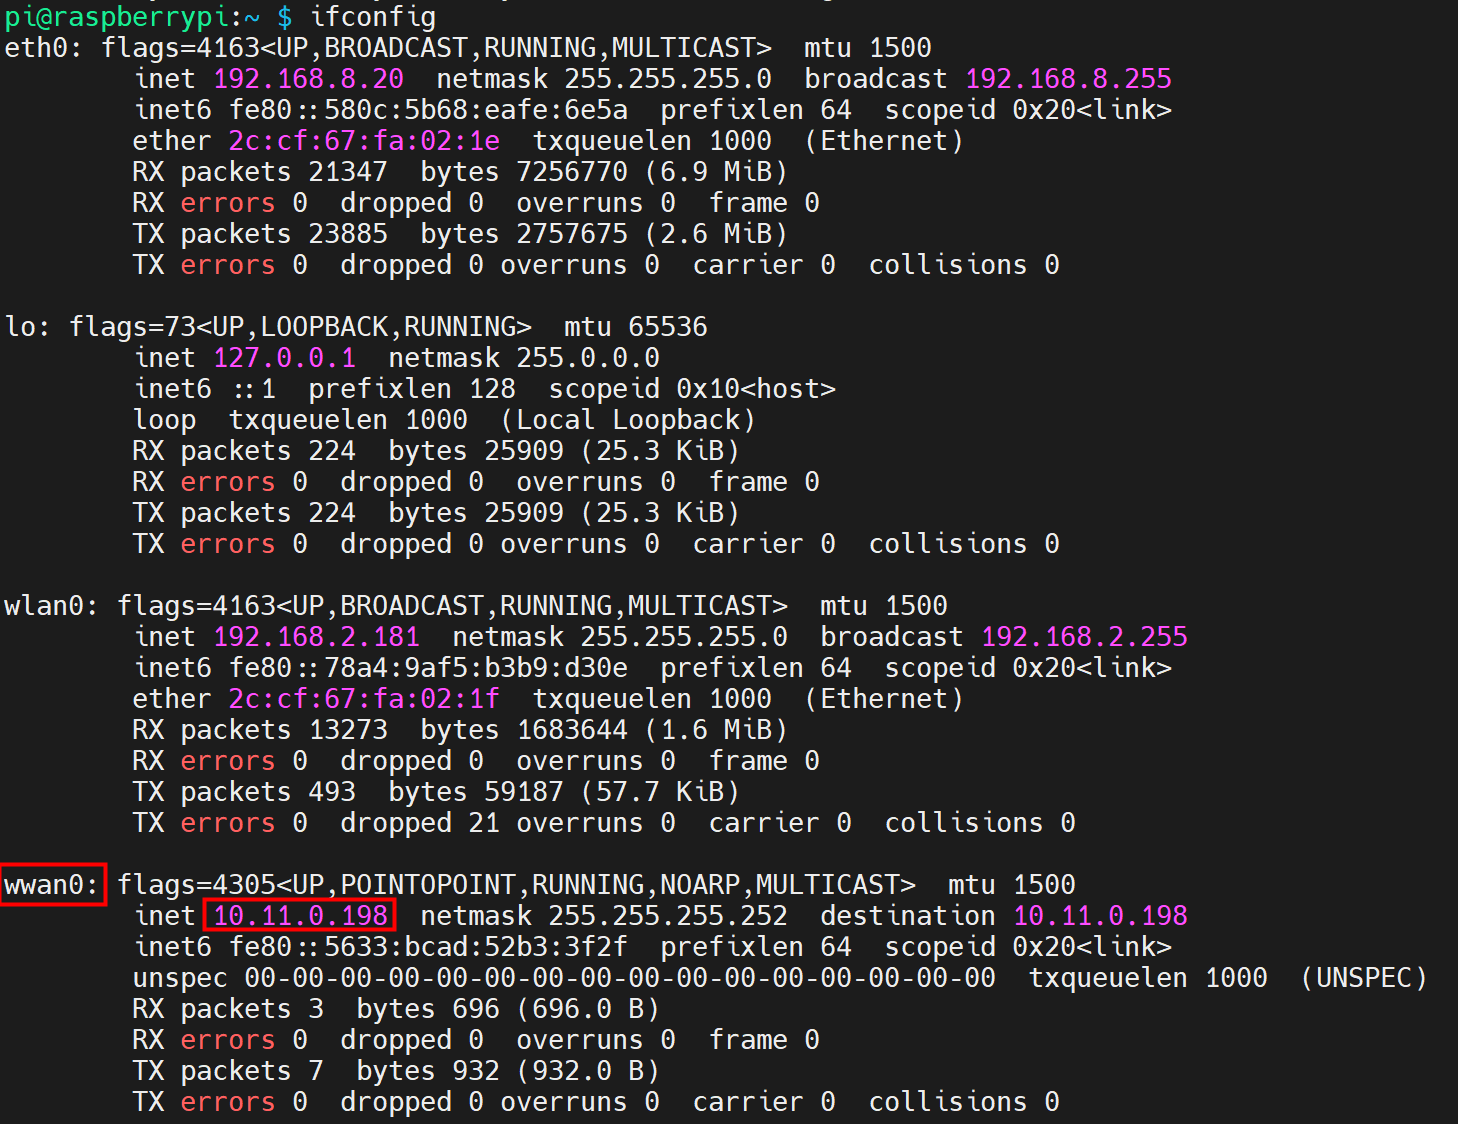
- If the wwan0 interface in the returned information displays a specific IP address, it indicates that the 4G network is connected.
- If the wwan0 interface in the returned information does not display a specific IP address, it indicates that the 4G network is not connected.
- Execute the following command to query the status of the 4G service.
sudo systemctl status ed-lte-daemon.service
The returned information is as shown in the figure below:
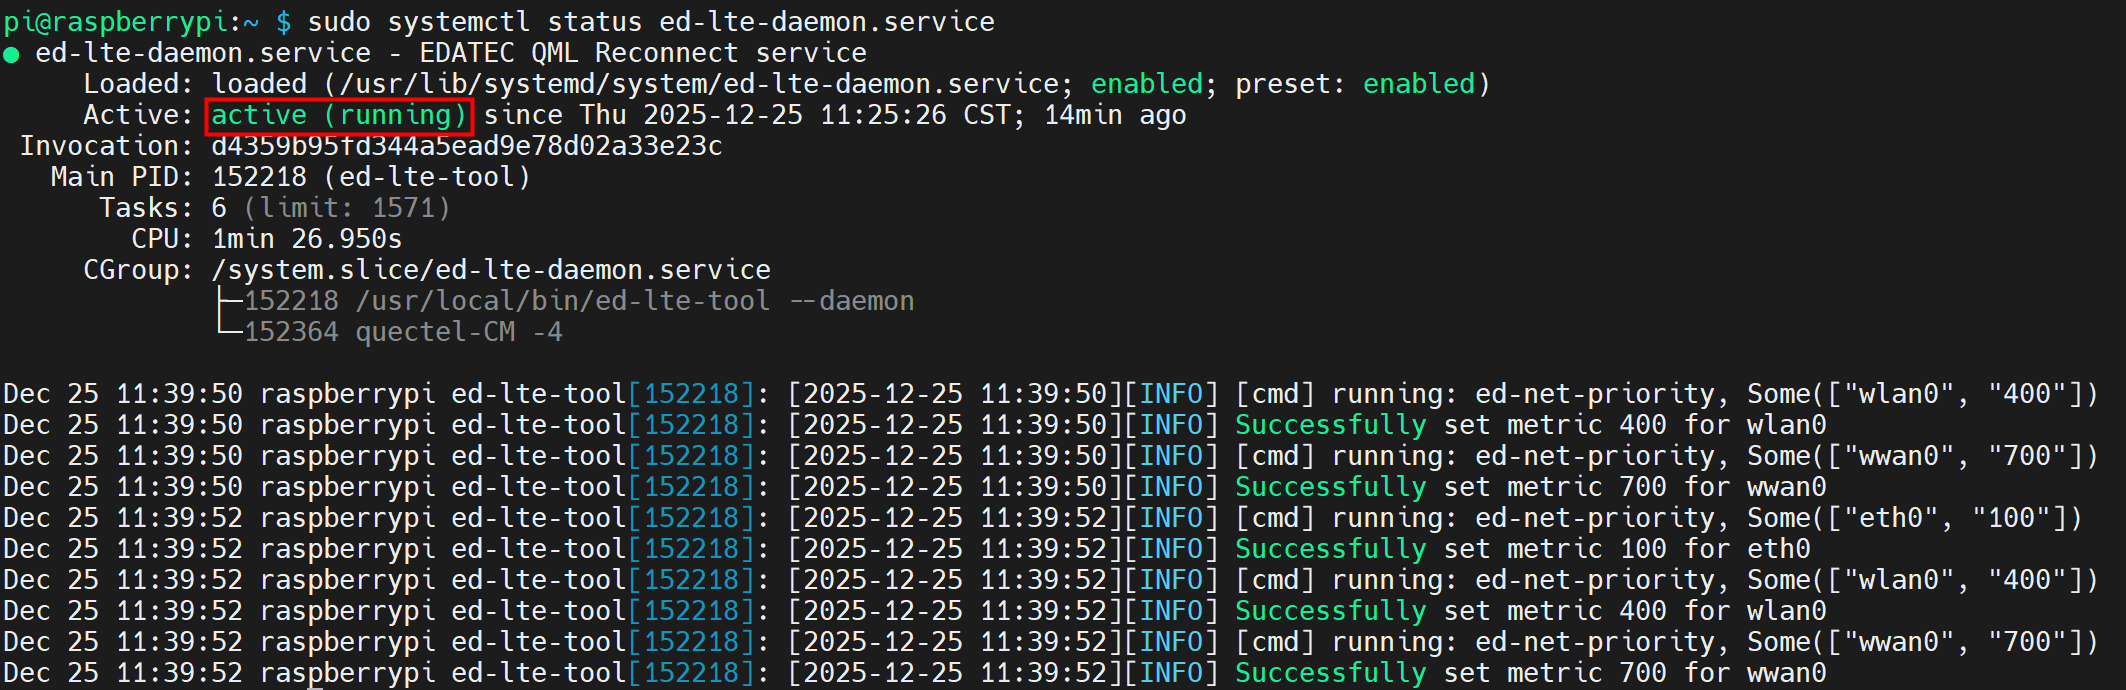
- If the information at the marked position in the returned message shows "Active: active (running)", it indicates that the 4G status is normal.
- If the information at the marked position in the returned message shows "Active: inactive (dead)", it indicates that the 4G status is abnormal.
2.2.2 Scenarios With APN Configuration
After completing the installation of the 4G dial-up reconnection software package, if the user's 4G network requires APN configuration, it can be configured by following the steps below.
Preparation:
- The ED-IPC2100 device has started normally.
- A Nano SIM card with 4G network service has been correctly installed into the device's SIM card slot.
- The APN name, username, and password have been obtained. The following information is used as an example:
- APN name: APN1
- Username: admin
- Password: admin
NOTE
Please turn off the power before inserting or removing the Nano SIM card.
Steps:
- Open the command window and execute the following commands in sequence to open the ed-qml.conf configuration file.
cd /etc/
sudo nano ed-qml.conf
- Configure the "apn", "apn_user", and "apn_password" in the "APN Config" section as needed.
TIP
- Parameters such as "4G reset", "Network", and "intervaltime" all support user configuration as needed.
- When configuring "apn", "apn_user", and "apn_password", please remove the
#symbol before the parameters to enable them.
Press
Ctrl+Oto save the file, then pressEnter, and finally pressCtrl+Xto exit the file editing mode.Execute the following command to restart the 4G network service for the configuration to take effect.
sudo systemctl restart ed-lte-daemon.service
- Open the command window and execute the following command to check if the 4G network is connected.
ifconfig
The returned information is as shown in the figure below (the wwan0 interface indicates the 4G interface):
- If the wwan0 interface in the returned information displays a specific IP address, it indicates that the 4G network is connected.
- If the wwan0 interface in the returned information does not display a specific IP address, it indicates that the 4G network is not connected.
- Execute the following command to query the status of the 4G service.
sudo systemctl status ed-lte-daemon.service
The returned information is as shown in the figure below:
- If the information at the marked position in the returned message shows "Active: active (running)", it indicates that the 4G status is normal.
- If the information at the marked position in the returned message shows "Active: inactive (dead)", it indicates that the 4G status is abnormal.
3 Basic Configuration Commands
If the 4G network cannot be connected, use the following commands for querying and configuration.
| Command | Description |
|---|---|
| sudo ed-lte-tool --daemon | Start the 4G monitoring program and automatically connect to the 4G network |
| ifconfig | Check if the 4G network is connected. The wwan0 interface represents the 4G interface, as shown in the figure below.
|
| sudo systemctl status ed-lte-daemon.service | Check the service status of 4G, as shown in the figure below.
|
| sudo systemctl enable ed-lte-daemon.service | Enable the 4G service |
| sudo systemctl start ed-lte-daemon.service | Start the 4G service |
| sudo systemctl stop ed-lte-daemon.service | Stop the 4G service |
| sudo ed-lte-tool -m | View 4G module information |
| sudo ed-lte-tool -s | Check 4G signal strength |
| sudo ed-lte -c | Dial-up to connect to the internet |
| sudo ed-lte -d | Disconnect the network connection. Automatic reconnection is not supported after disconnection |
| cd /var/log/ed-qmi/ sudo nano xxxx-xx-xx.log | Enter the /var/log/ed-qmi/ directory to view log files, where xxxx-xx-xx is year-month-day, format like 2025-06-18 |
| journalctl -u ed-lte-daemon.service | View real-time logs of the 4G network |
TIP
When the 4G port connection is normal, if the 4G service status is found to be abnormal, you can execute the following commands in sequence to enable and start the 4G service.
sudo systemctl enable ed-lte-daemon.service
sudo systemctl start ed-lte-daemon.service
4 Configuring 4G Network Parameters
After the network is normally connected via the 4G dial-up reconnection software, users can open the ed-qml.conf file to configure 4G network parameters such as 4G module reset, 4G indicator light, APN authentication type, ping network connection status detection conditions, interval time between two pings, and 4G network priority as needed.
TIP
When configuring parameters, please remove the # symbol before the parameters to enable them.
4.1 Configuring 4G Module Reset
Supports enabling 4G module reset in the ed-qml.conf file.
Steps:
- Open a command window, execute the following commands in sequence to open the
ed-qml.conffile.
cd /etc/
sudo nano ed-qml.conf
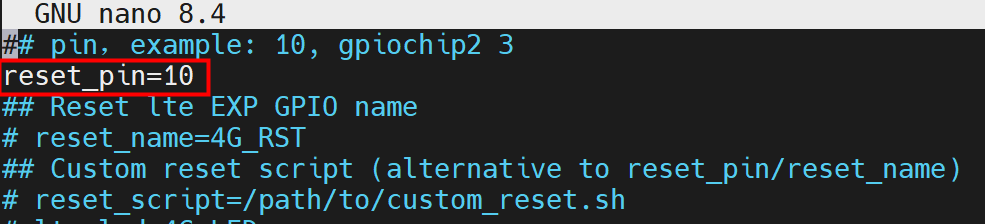
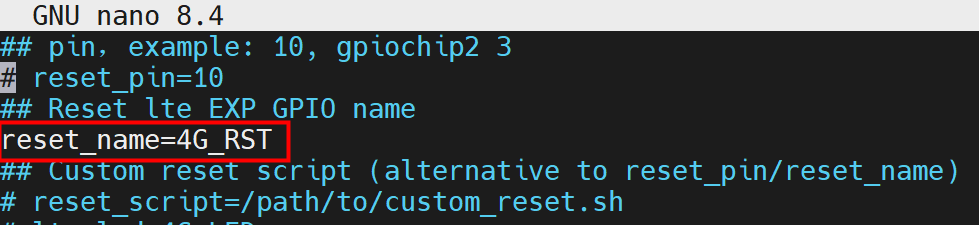
- Configure the reset parameters for the 4G module as needed. The 4G module reset can be implemented via Pin number, Pin name, or a custom script. Users can choose one method to set based on the actual situation.
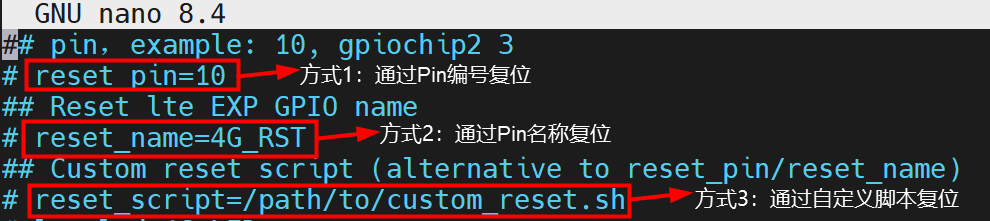
- Configuration via Pin number:
- Configuration via Pin name:
- Configuration via custom script:

The Pin numbers and Pin names vary for each device model. Please configure according to the actual values.
| Product Model | Pin Number | Pin Name |
|---|---|---|
| ED-CM4SEN | 10 | - |
| ED-CM4MEDIA | 10 | - |
| ED-CM4IND | 10 | - |
| ED-IPC2100 | - | 4G_RST |
| ED-IPC2200 | - | 4G_RST |
| ED-SBC2300 | - | 4G_RST |
| ED-IPC2500 | - | 5G_RST |
| ED-IPC2600 | - | 4G_RST |
| ED-IPC3100 | - | 4G_RST |
| ED-SBC3300 | - | 4G_RST |
| ED-IPC3600 | - | 4G_RST |
| ED-PLC2010 | - | 4G_RST |
Press
Ctrl+Oto save the file, then press Enter, and finally pressCtrl+Xto exit the file editing mode.Execute the following command to restart the 4G network service for the configuration to take effect.
sudo systemctl restart ed-lte-daemon.service
TIP
After the 4G module reset parameters are configured, when the network connection is abnormal, the mechanism of the 4G reconnection dial-up software is to first automatically connect. If the connection remains abnormal, it will initiate flight mode detection. If the 4G network still cannot connect after flight mode detection, the software will automatically reset the 4G module, with intervals of 10 minutes, 20 minutes, 30 minutes, and 1 hour sequentially.
4.2 Configuring the 4G Module LED
Supports configuring the 4G module LED in the ed-qml.confconfiguration file.
Steps:
- Open a command window, execute the following commands in sequence to open the
ed-qml.conffile.
cd /etc/
sudo nano ed-qml.conf
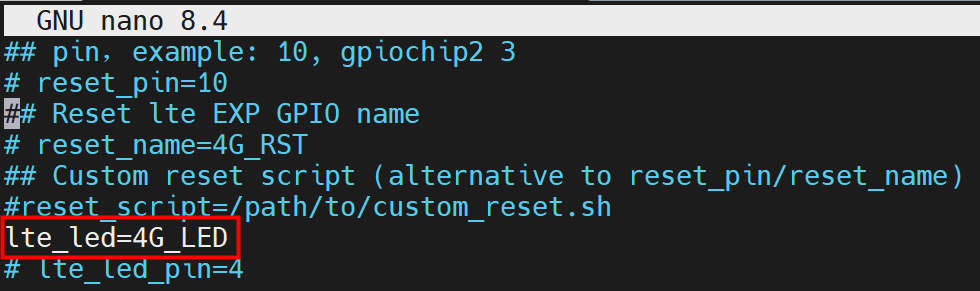
- Configure the 4G module LED as needed. The 4G module LED can be implemented via Pin number or LED name. Users can choose one method to set based on the actual situation.
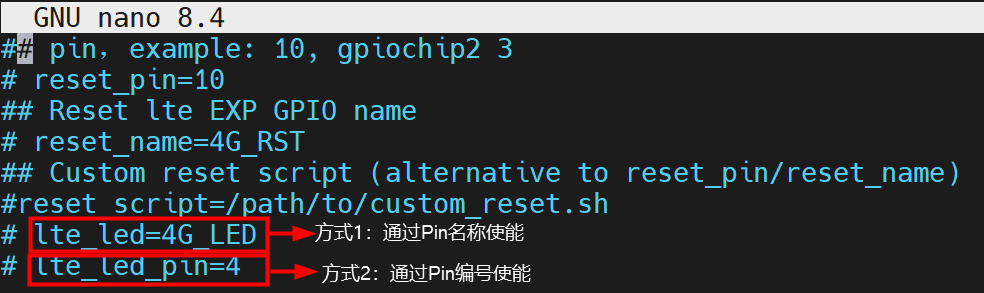
- Configuration via Pin number:

- Configuration via Pin name:
The Pin numbers and names corresponding to the 4G module LED vary for each device model. Please configure according to the actual values.
| Product Model | LED Pin Number | LED Name |
|---|---|---|
| ED-IPC2100 | - | 4G_LED |
| ED-IPC2200 | - | 4G_LED |
| ED-IPC2500 | - | 4G_LED |
| ED-IPC2600 | - | 4G_LED |
| ED-IPC3100 | - | 4G_LED |
| ED-IPC3600 | - | 4G_LED |
Press
Ctrl+Oto save the file, then press Enter, and finally pressCtrl+Xto exit the file editing mode.Execute the following command to restart the 4G network service for the configuration to take effect.
sudo systemctl restart ed-lte-daemon.service
TIP
After configuring the 4G module LED, the 4G LED indicator has two states.
- While the network is connecting, the 4G LED indicator blinks.
- After the network is normally connected, the 4G LED indicator stays ON.
4.3 Configuring APN
Supports configuring APN in the ed-qml.conf file.
Steps:
- Open a command window, execute the following commands in sequence to open the
ed-qml.conffile.
cd /etc/
sudo nano ed-qml.conf
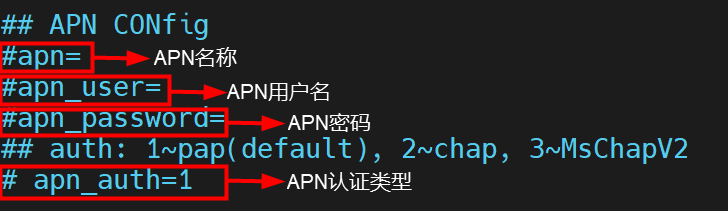
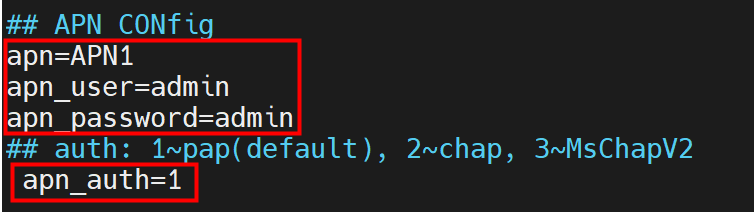
- Set "apn", "apn_user", and "apn_password" in the "APN Config" section as needed.
- APN Name: User-defined.
- APN Username: User-defined.
- APN Password: User-defined.
- APN Authentication Type: Default is pap. Users can configure it to chap or MschapV2 according to the actual type of the SIM card.
Configuration example:
Press
Ctrl+Oto save the file, then press Enter, and finally pressCtrl+Xto exit the file editing mode.Execute the following command to restart the 4G network service for the configuration to take effect.
sudo systemctl restart ed-lte-daemon.service
4.4 Configuring ping_server
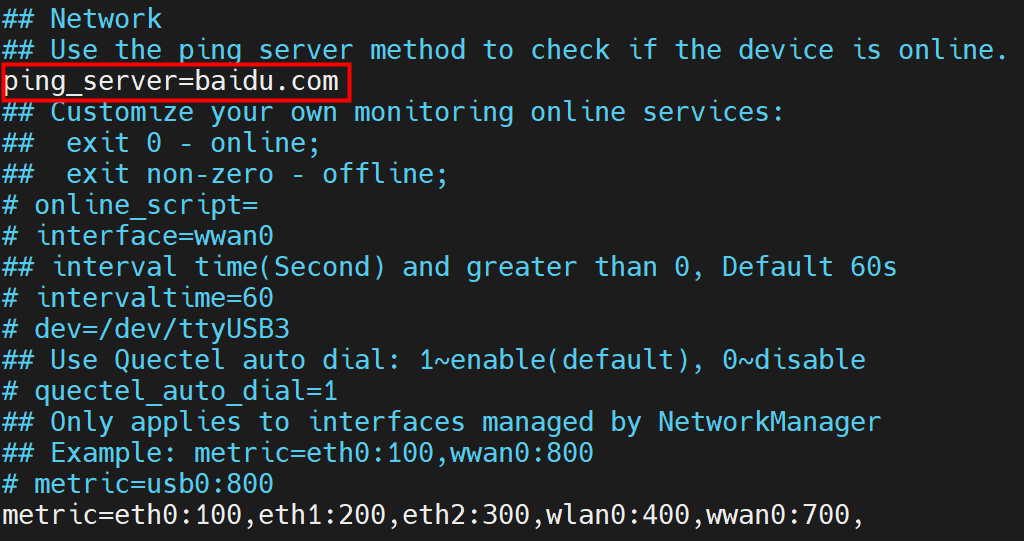
Since some users use internal networks, it is necessary to configure the ping_server to an internal URL to properly detect network status. Supports configuring the network's ping_server in the ed-qml.conf file.
Steps:
- Open a command window, execute the following commands in sequence to open the
ed-qml.conffile.
cd /etc/
sudo nano ed-qml.conf
- Set the network's ping_server as needed.

Configuration example:
Press
Ctrl+Oto save the file, then press Enter, and finally pressCtrl+Xto exit the file editing mode.Execute the following command to restart the 4G network service for the configuration to take effect.
sudo systemctl restart ed-lte-daemon.service
4.5 Configuring Network Priority
Supports configuring network priority in the ed-qml.conf file.
Steps:
- Open a command window, execute the following commands in sequence to open the
ed-qml.conffile.
cd /etc/
sudo nano ed-qml.conf
- Set the metric values for eth0, eth1, eth2, wlan0, and wwan0 as needed to adjust the priority of network ports.

- eth0, eth1, and eth2: Represent Ethernet interfaces. The number of interfaces varies by device model.
- wlan0: Represents the Wi-Fi interface.
- wwan0: Represents the 4G network interface.
A larger metric value for an interface corresponds to a lower priority for that interface. As shown in the figure above, the network priority is: eth0 > eth1 > eth2 > wlan0 > wwan0.
Press
Ctrl+Oto save the file, then press Enter, and finally pressCtrl+Xto exit the file editing mode.Execute the following command to restart the 4G network service for the configuration to take effect.
sudo systemctl restart ed-lte-daemon.service