Configuring Ethernet IP
The IP address is automatically obtained by default. If you need to reconfigure the IP, you can configure it through NetworkManager and dhcpcd.
Configure IP by Using The NetworkManager Tool
The operating systems of Desktop and Lite have enabled NetworkManager by default, which can be directly configured by using NetworkManager.
Raspberry Pi OS(Desktop)
In the Desktop version of the operating system, it is recommended to use the graphical NetworkManager tool to configure IP.
WARNING
The Desktop version of the operating system has the NetworkManager graphical tool installed by default.
Preparation:
Wi-Fi is enabled.
Steps:
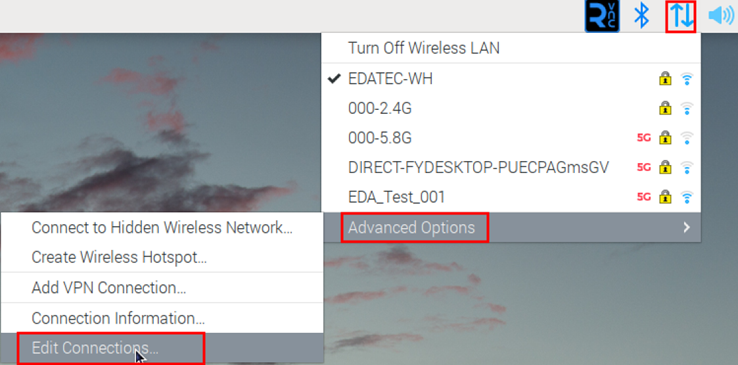
- Left-click the
 icon and select "Edit Connections…" from the menu.
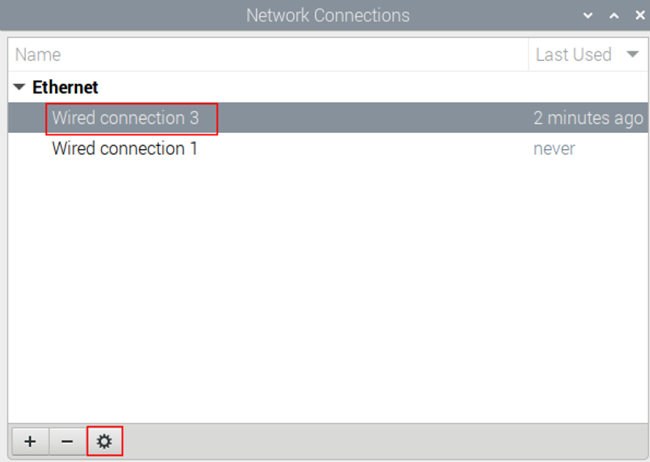
- In the pop-up "Network Connections" pane, select the connection name to be modified, and then click the Settings button below.
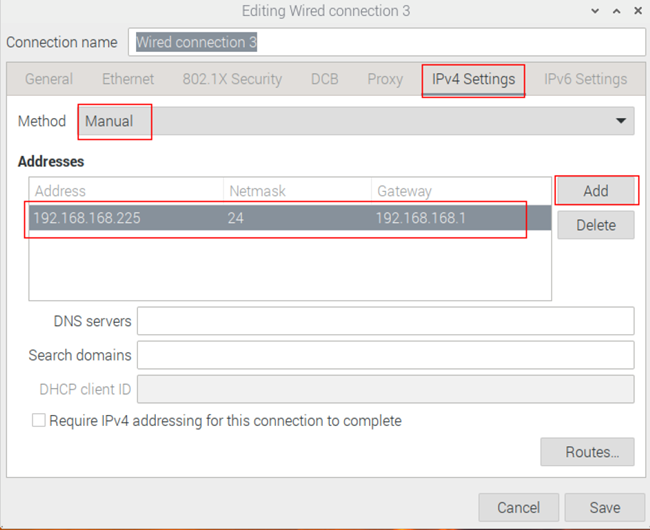
- In the pop-up "Editing Wired connection" pane, select the "IPv4 Settings" page, and then set the IP address as required.
- If you want to set the IP as a static IP, set the "Method" as "Manual", add an entry in Addresses and enter the corresponding IP address information.
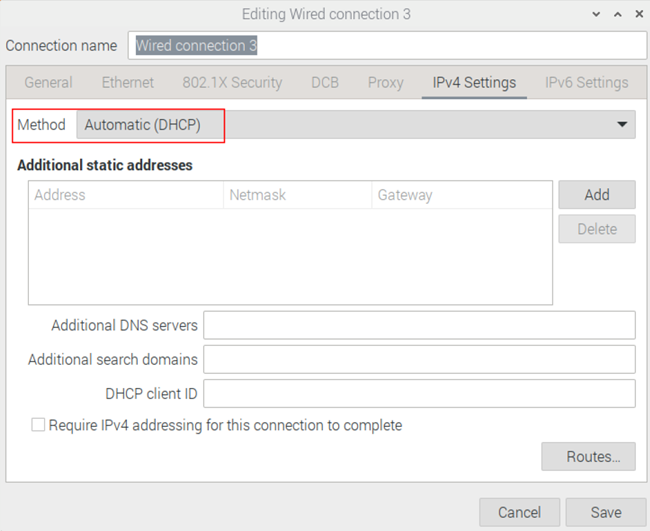
- If you want to set the IP to automatic mode, you only need to set the "Method" as "Automatic(DHCP) ".
- Click "save" to return to "Network Connections" pane and close the page.
- Execute the sudo reboot command to restart the device.
Raspberry Pi OS(Lite)
In the Lite version of operating system, it is recommended to use the command to configure IP.
Preparation:
NetworkManager is enabled.
Steps:
Set a static IP address
- Get the assigned IP address, subnet mask and gateway address, for example, the IP address is 192.168.1.101/24 and the gateway IP is 192.168.1.1.
- Obtain the connection name to be modified, for example
e167c45f-efed-3f8d-89a5-f2430f92fae8. In the command pane, run the following command to query the connection name.
nmcli c

- Execute the following command to set the IP address to the obtained IP address.
sudo nmcli connection modify e167c45f-efed-3f8d-89a5-f2430f92fae8 ipv4.addresses 192.168.1.101/24 ipv4.method manual
- Execute the following command to set the gateway IP to the obtained gateway IP.
sudo nmcli connection modify e167c45f-efed-3f8d-89a5-f2430f92fae8 ipv4.gateway 192.168.1.1
Set the IP to automatic mode
- Obtain the connection name to be modified, for example e167c45f-efed-3f8d-89a5-f2430f92fae8. In the command pane, run the following command to query the connection name.
nmcli c

- Execute the following command to set the way of obtaining IP address to automatic mode.
sudo nmcli connection modify e167c45f-efed-3f8d-89a5-f2430f92fae8 ipv4.method auto
Configure IP by Using The dhcpcd Tool
Since NetworkManager is enabled on the Desktop and Lite of operating systems by default. If you need to switch to using the dhcpcd tool for configuration, you need to stop and disable the NetworkManager service and enable the dhcpcd service before configuration.
Steps:
- Execute the following command to stop the NetworkManager service.
sudo systemctl stop NetworkManager
- Execute the following command to disable the NetworkManager service.
sudo systemctl disable NetworkManager
- Execute the following command to enable the dhcpcd service.
sudo systemctl enable dhcpcd`
- Execute the following command to restart the device.
sudo reboot
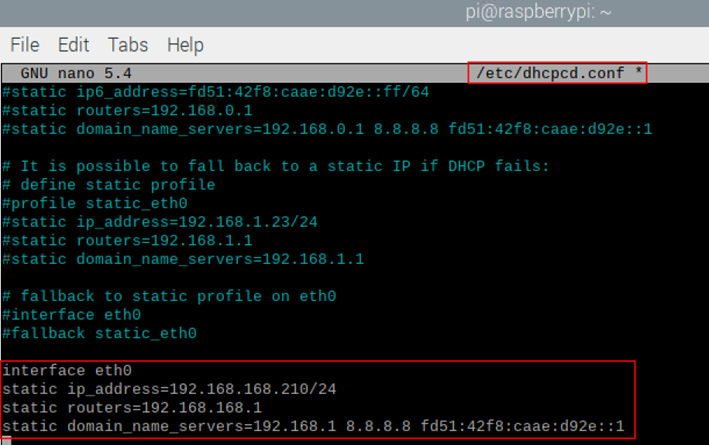
- Execute the following command to open the /etc/dhcpcd.conf file.
sudo nano /etc/dhcpcd.conf
- Add the following content at the end of the /etc/dhcpcd.conf file.
   interface eth0
   static ip_address=192.168.168.210/24
   static routers=192.168.168.1
   tatic domain_name_servers=192.168.168.1 8.8.8.8 fd51:42f8:caae:d92e::1
eth0is the Ethernet port of the IP to be configured;- 192.168.0.10/24 indicates the IP address and subnet mask to be configured;
- 192.168.0.1 indicates the gateway IP to be configured;
- 8.8.8.8 represents the DNS server address, which should be configured according to the actual needs.
- fd51:42f8:caae:d92e::1 indicates the IPV6 address, which should be configured according to the actual needs.
- Use Ctrl+S to save the file, then enter Ctrl+X to exit edit mode.
- Execute the following command to reboot the device.
sudo reboot