Configuring Audio
The device contains one audio (supports access to MIC) and one extended speaker output. The volume of Master, MIC and Speaker can be adjusted, and support recording for MIC.
Adjust The Volume
It supports manual adjustment of MIC, Speaker and Master volume.
- If you are using the Desktop version of the operation system, you can adjust the volume of the MIC and Master directly through the desktop icon.
Steps:
- Click the icon
 or
or in the upper right corner of the desktop to open the volume adjustment column.

- Drag the button of the volume adjustment column up and down to adjust the volume, check or uncheck the Mute check box to mute and unmute the audio.
- Both Desktop and Lite versions of the operation system support opening the volume adjustment interface through the command line to adjust the volume.
Steps:
- Execute the following command to open the volume adjustment interface.
alsamixer
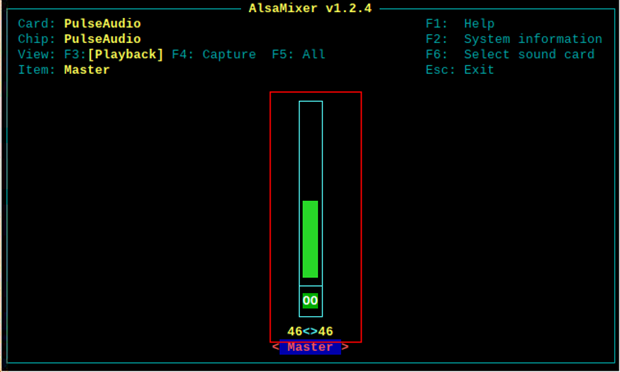
- View the volume value of the current Master in the opened interface. You can adjust the volume through the ↑ key and ↓ key on the keyboard, and press the M key to mute and unmute the audio.
| Keyboard Key | Function |
|---|---|
| ↑ | Volume+ |
| ↓ | Volume- |
| M | Mute or Unmute |
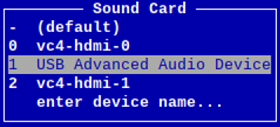
- Press F6 to open "Sound Card" interface, select "1 USB Advanced Audio Device".
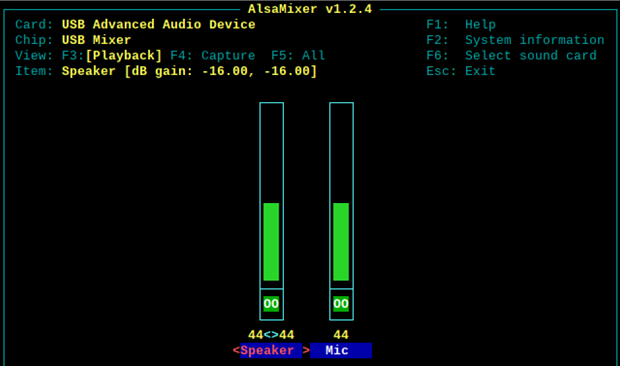
- Press Enter to open the volume interface of MIC and Speaker, and you can adjust the volume of MIC and Speaker respectively throughthe ↑ key and ↓ key on the keyboard, and press M to mute and unmute MIC/Speaker.
| Keyboard Key | Function |
|---|---|
| ↑ | Volume+ |
| ↓ | Volume- |
| M | Mute or Unmute |
Configure Recording
It supports the audio recording of MIC input.
Preparation:
The audio interface has been connected to MIC.
Steps:
- Execute the following command to open the volume adjustment interface.
alsamixer
- Press F6 to open the "Sound Card" interface, select "1 USB Advanced Audio Device", and press Enter to open the volume adjustment interface of MIC and Speaker to ensure that MIC is not muted.
- Press Esc to exit to the command pane, execute the following command to start recording audio named audio1, as shown in the figure below.
arecord -fcd -Dhw:1 -c 1 --vumeter=mono audio1 | aplay -fcd -Dhw:1

| Parameters | Description |
|---|---|
| cd | Indicates the audio format, which can be set to cd, cdr, dat and other formats, and can be set as needed. |
| 1 | Indicates the sound card for recording, it needs to be obtained by executing `arecord -`l before recording, as shown in the following figure: |
| audio1 | Indicates the recorded file name, which can be customized by the user. |
- Use Ctrl+C to close recording.
- Execute the following command to obtain the storage path of the recording file.
pwd
